Regenerative No-Dig System for Overwintering Dahlias in Zone 6b/7
Initial Planting of Dahlias
Prepare new beds for planting using no-till methods such as cardboard and deep mulch and/or cover cropping and tarping. Amend soil according to soil test recommendations. Pay particular attention to pH and mineral content. Dahlias prefer a pH around 6.5; slightly acidic. It will be difficult to change the pH once the overwintering dahlias are perennialized so be sure to take the time to make adjustments prior to planting.
In Zone 6b/7, new dahlia tubers are typically planted in early to mid-May once danger of frost has passed. Dahlias can be planted anywhere from 18” to 36” apart, depending on your goals and available space. At Love ‘n Fresh Flowers, dahlias are planted 18” apart for maximum production of cut flowers with long straight stems.
Overwintering Dahlias
For overwintering dahlias in the ground here at Love ‘n Fresh Flowers in Zone 6b/7, the following steps are taken:
1. Wait until a hard frost has turned the plants black to put the dahlias to bed. If no hard frost has happened by early November, it is safe to begin anyway.
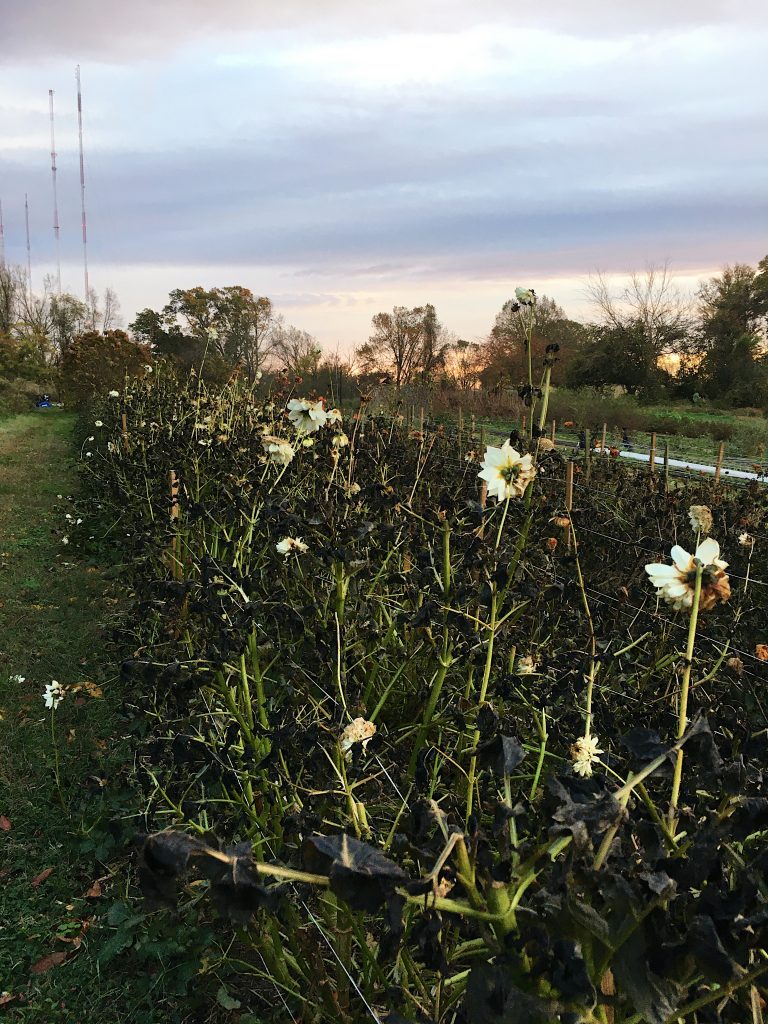
Dahlias killed by the frost and ready to put to bed.
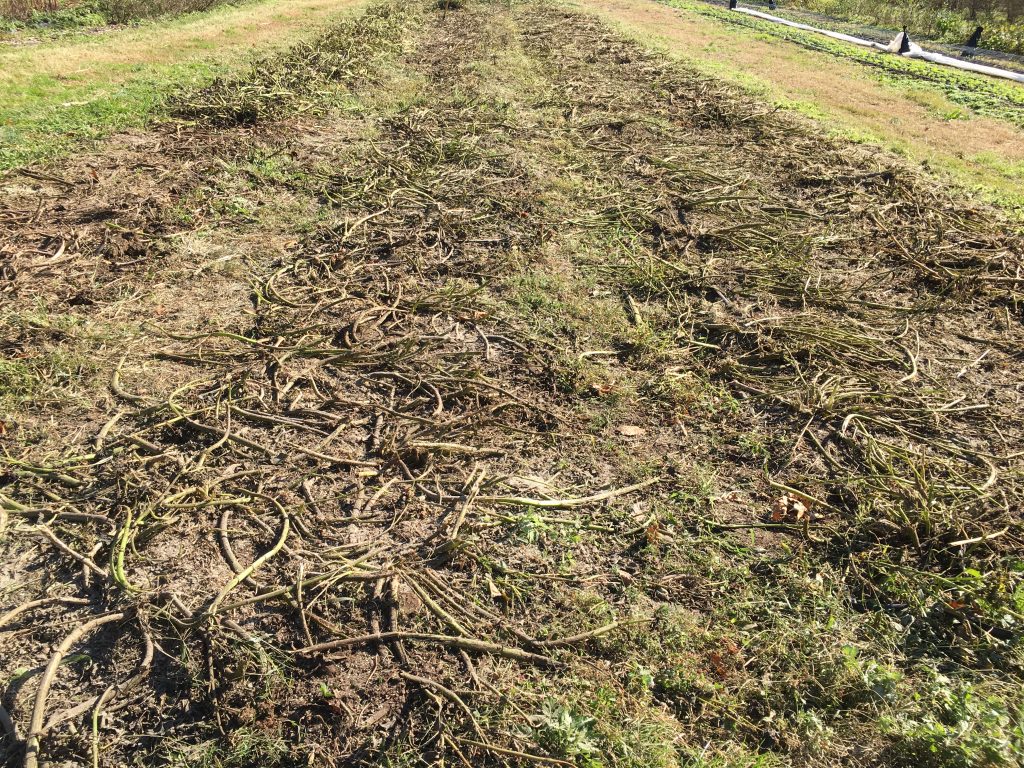
2. Cut the dahlias down at the base, leaving only an inch or two at most of a “stump”. Lay the cut debris directly on top of the dahlias beds so it can compost in place and feed next year’s crop. Chopping up the stems into slightly smaller pieces may help them be a little more tidy on top of the beds. *We use a mulching push mower if the plants aren’t too massive and the mower can get through them. You could also use a flail mower. If you do not have a mower, just going through and cutting them down by hand is fine.
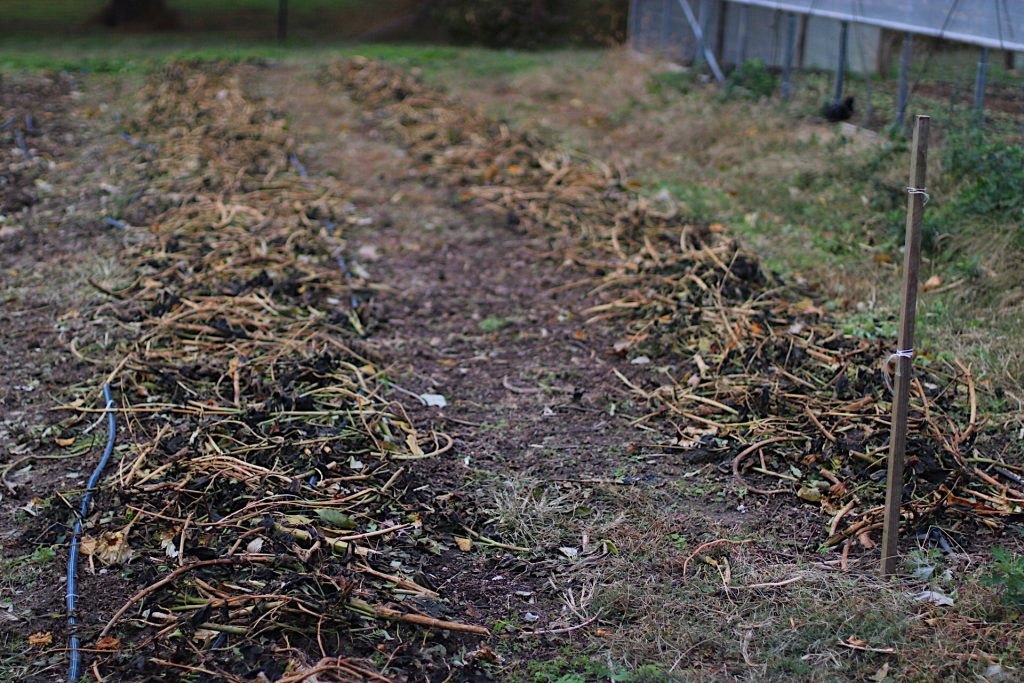
The stalks of the dahlias chopped down and laid on top of the beds.
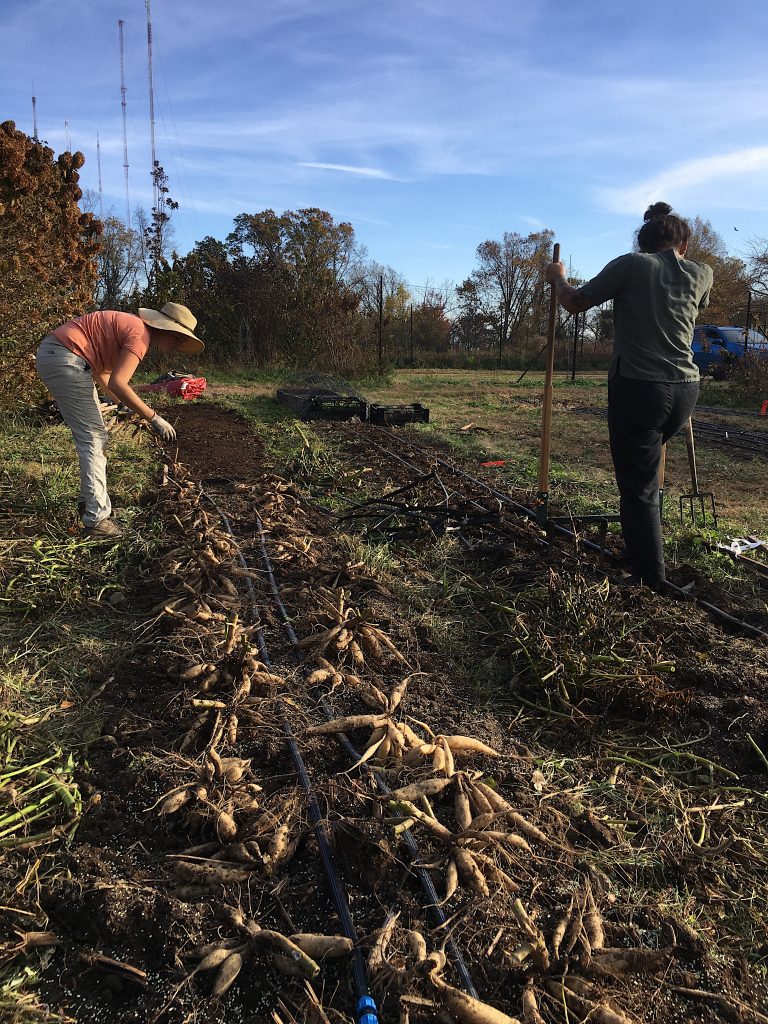
3. After all plants are cut down in the patch, broadcast/side dress any soil amendments as determined by a soil test taken in August (i.e., sulfur or lime to adjust pH or rock dusts to address a certain mineral deficiency).
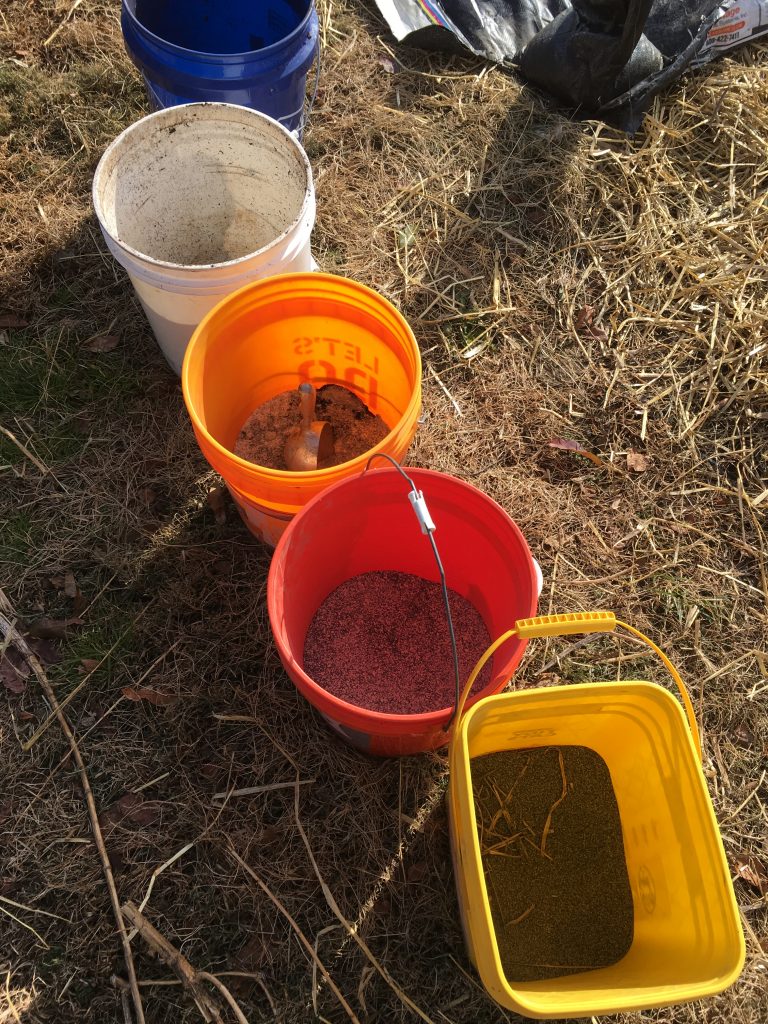
Add amendments to the dahlia beds after cutting down the foliage.
4. After soil amendments are broadcast, add a layer of aged compost to the overwintering dahlia beds, ideally 1-2 inches, to provide a rich carbon source for the soil biology over the winter and to cover the soil amendments so they are naturally incorporated more quickly.
5. OPTIONAL After the compost is added, use a broad fork to loosen the soil around the edges of each bed. While some tubers may be damaged slightly by this forking, if your overwintering dahlias are in the ground for several seasons, the soil settles and you’ll want to get air pockets back into the soil for good oxygen exchange. Insert the broad fork deeply at the side of the bed and wiggle it back and forth to open up the “crust”. Do not invert/turn the soil in any way. Just loosen it. Do this along all outside edges of the dahlias beds.
Beds ready to be mulched after being forked and amended.
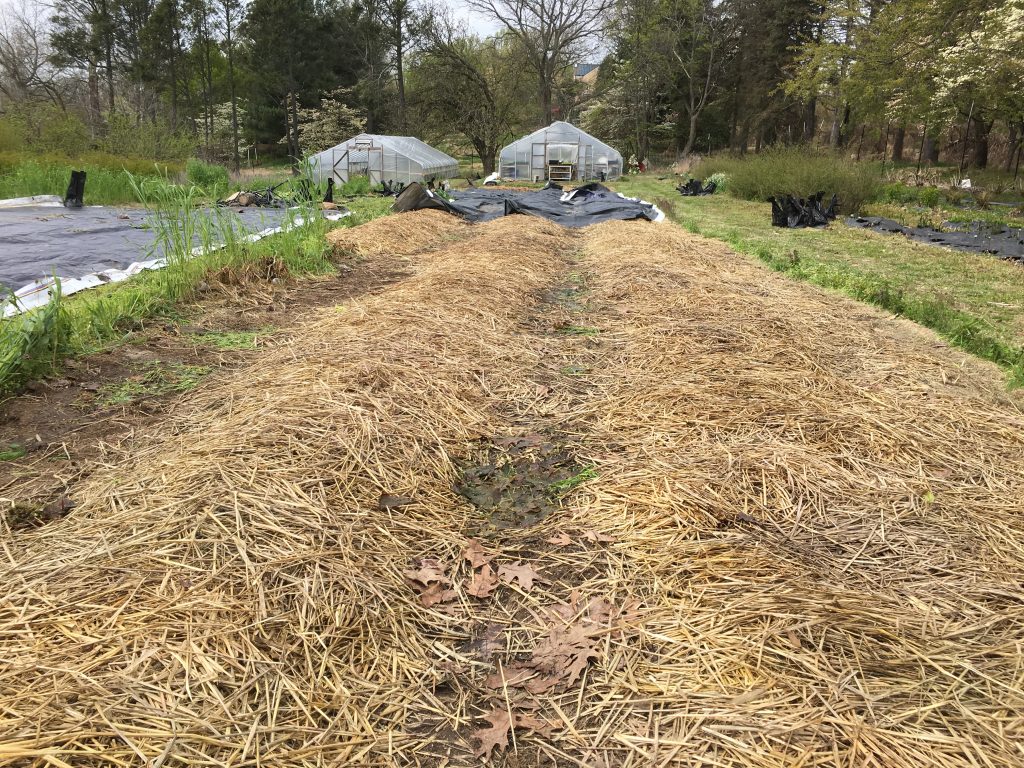
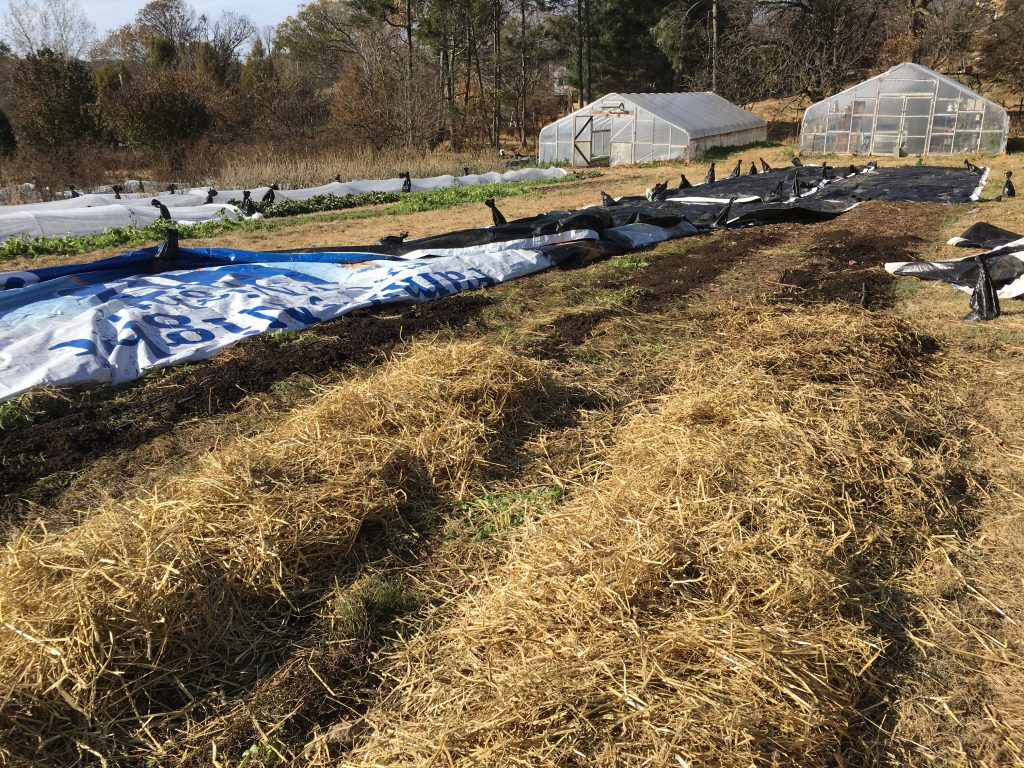
6. Now it’s time to put a thick blanket over the entire patch. At Love ‘n Fresh Flowers, we use a combination of leaves and straw, depending on what we can get most easily each year. Grocery stores are usually tossing straw bales from their autumn displays right after Halloween as they change over for Christmas. Perfect timing to snag them for your dahlia beds. Many people are removing leaves from their lawns in early November too so also a free resource. You may be able to partner with a lawncare service or local municipality to have them dump leaves at your farm, which is very convenient, but the quality of these sources may be questionable and include lots of trash. Pine straw is another great option if you’ve got lots of pine forests near you. Regardless of the source and material, spread 8”-12” over the entire dahlia patch (walkways included). This will insulate your tubers through the coldest days of winter.
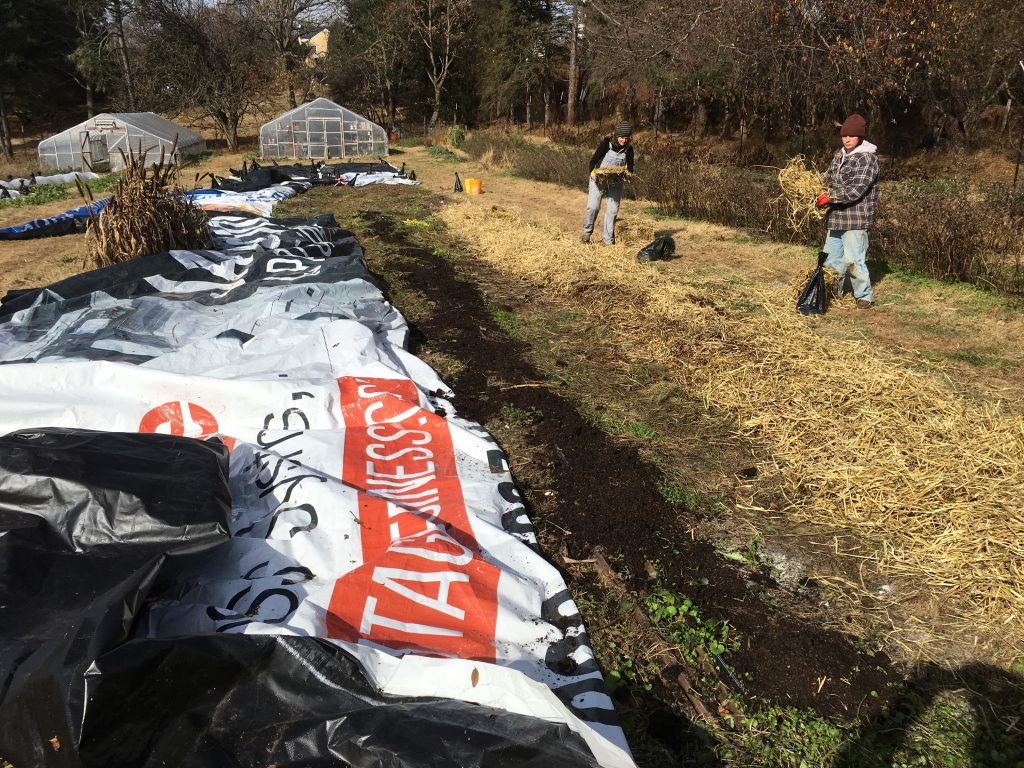
Spread straw or leaves over the beds.
8. OPTIONAL After spreading the leaves and/or straw, spray the surface with JMS (or what I call “leaf mold tea”). Create the tea by collecting a big handful of rich, decomposed leaf mold from a nearby wooded area and steeping it in a bucket of water (use cheese cloth or a fine mesh strainer to hold the leaf mold) with a boiled potato as a food source for the abundant natural biology found in the handful of leaf mold. Steep the tea for about a 4-5 days before straining it and applying it with a sprayer or watering can to the surface of your dahlia beds already tucked under their “blanket” of organic matter. This tea will enliven the entire system in your perennialized dahlias to keep the soil loose and active from season to season. I learned how to make this using the book The Regenerative Grower’s Guide to Garden Amendments by Nigel Palmer.
9. Last step is to officially tuck in the overwintering dahlias with tarps. Use large heavy impermeable (water tight) tarps to cover the entire dahlia patch. At Love ‘n Fresh Flowers, we use old billboards, but silage tarps and/or construction tarps will also work well. Weight down the tarps with sand bags and/or rocks. Be sure to put plenty of weights on the tarps (far more than you think are necessary!) because the winter winds will blow off the tarps and expose your dahlias to cold if you don’t have them well-secured.
Maintaining Established Perennial Dahlia Beds
Once the dahlias are established, the following steps are taken to ensure their longevity and productivity:
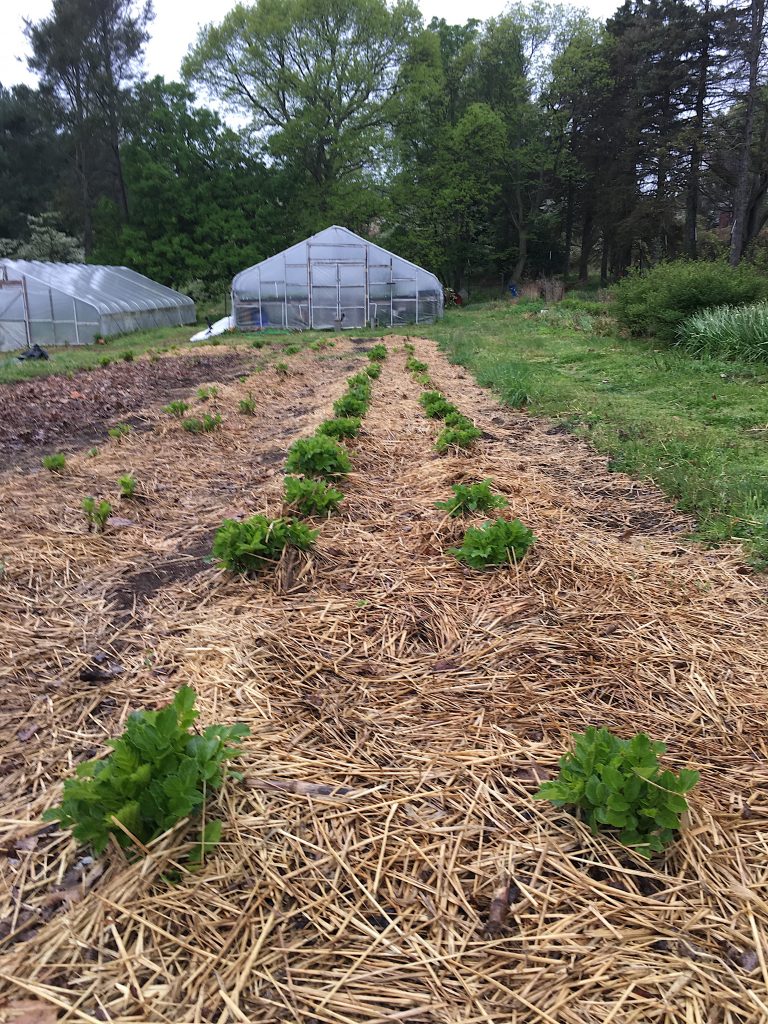
1. Pull the tarps off of the beds in mid-April when the temperatures seem to stabilize. It helps to peek under the tarps from time to time to see if there are any shoots pushing through. If there are, it’s time to take the tarps off. Over the course of the winter, the soil biology (earthworms, microbes, etc) will have been making good use of the organic mulch too and we find that typically there’s only about an inch or so left of all the leaves and straw we put on at the start of the winter. So no need to worry about pulling off the leaves/straw. In fact, it’s the perfect thickness to provide some weed control at the start of spring. One thing we do right away after taking the tarps off again and repeat every three weeks or so is spread pellets of the product Sluggo Plus on the beds, which controls slugs and earwigs which sometimes build up over the winter under the tarps. This product is organic and does a great job. You could also use homemade beer traps or create habitat for natural slug predators like ground beetles, garden snakes, and/or toads.
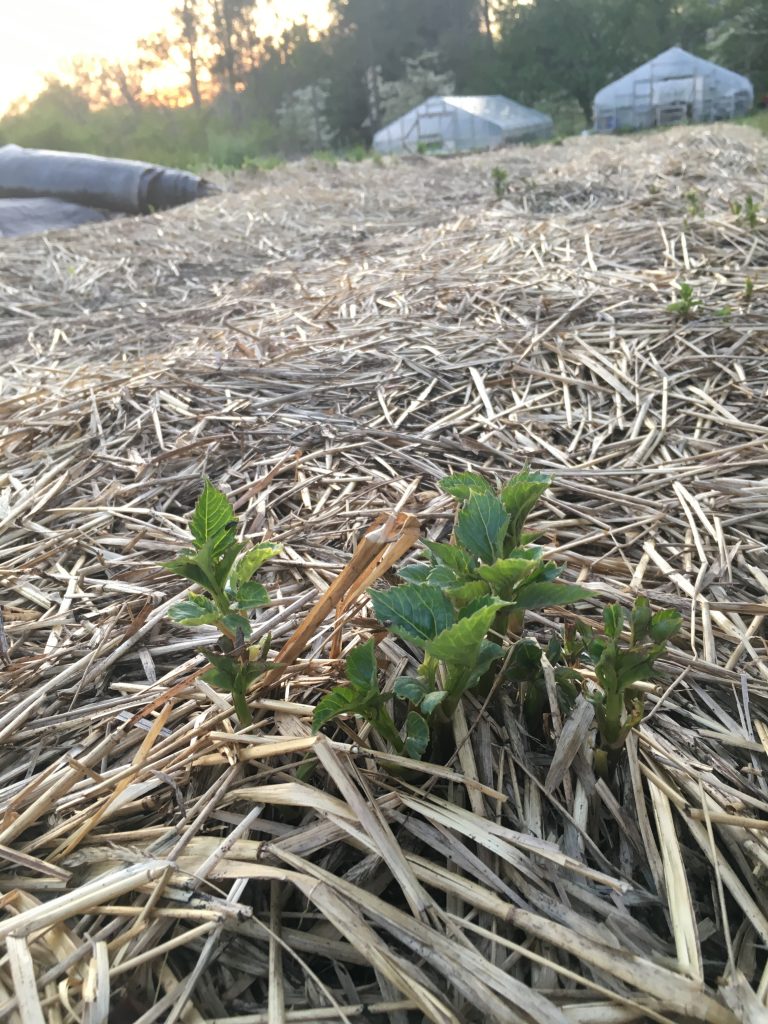
Dahlias emerging from the ground in late April after overwintering. Time to remove the tarps when you see this.
2. Overwintering dahlias are pinched once or twice to improve stem quality later in the season. Plants are pinched when they are about 8 inches high and/or have four sets of healthy leaves on the stem and may also be pinched once again when they grow back to 8 inches high after the first pinch. For each pinch, half the stem is removed (the stem is cut so two sets of leaves are taken off and two sets of leaves remain). The first pinch for perennialized dahlias is usually in mid-May. You may use the cuttings from pinching to root new plants.
4. The dahlias are fed throughout the season with a foliar spray calibrated to the plants’ needs at that stage in their growing cycle. Dahlias need a lot of nutrition for good flower production and plant scaffolding. Foliar feeding is the best method for delivering nutrients to perennialized dahlias. We use several Korean Natural Farming (KNF) applications on our dahlias here at Love ‘n Fresh Flowers as well as application of fish emulsion and kelp.
5. Harvest of flowers occurs throughout the season. With perennialized overwintering dahlias in Zone 6b/7, the first substantial harvest usually begins in late June and continues through late October. Peak production is in September.
6. Take soil samples for testing in late August to determine amendments that may need to be added in the coming autumn.
7. If desired, you may dig and divide tubers to increase your number of plants. Otherwise, no digging and dividing seems to be necessary in my experience. At Love ‘n Fresh Flowers, overwintering dahlias have been in the ground for five seasons without any dividing and they continue to be highly productive and healthy. If you’d like to increase your number of dahlia plants but don’t want to disturb your soil by digging up tubers, you can take cuttings instead to root and create new baby plants.
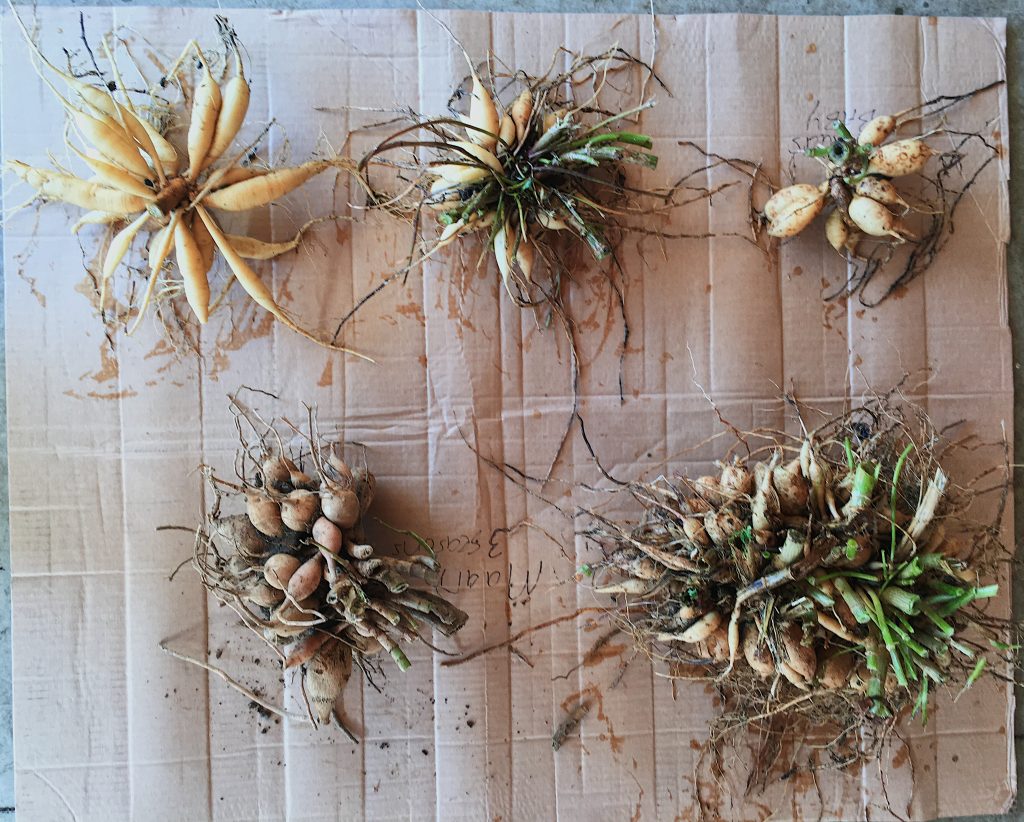
Dahlia clump comparison: Top row are all one year old clumps that were planted from either one single tuber or a cutting. Bottom row on the left is a 3 year old clump and bottom right is a five year old clump. All were super productive in flowering.
More information on no-till and regenerative flower farming practices can be found here.
This sounds like a great plan! My question concerns mole,vole, mice. Do they eat the tubers, or multiply under the plastic?
I have not experienced any vole/mole damage at my farm, but I do have two resident cats that love to hunt so that may be why.
Do your tubers freeze when covered for winter in this way? Do you ever loose tubers due to cold/wet? What is your soil like?
No, the tubers do not freeze. The deep blanket of leaves/straw keep them plenty warm and the tarp on top keeps them dry. I have only lost a few tubers over the many seasons I’ve overwintered dahlias in the ground. My soil is a mineral-heavy clay loam with moderate drainage. But really I think this can work in pretty much any soil type as long as the thick mulch and tarps are used, which insulate and keep everything dry.
Have you found any varieties that did not overwinter and died out? Some varieties seem to be hardier than others.
Nope. All that I am growing seem equally hardy. But I only grow 12 varieties in total at this point (used to grow over 100, but then wised up).
Do share your wedding choices, Jenny!! I have some favorites, white, blush, peach, rust, burgundy, etc.
Do you pull up the drip tape out of your beds or keep them in there? This post is awesome! Thank you, Jennie, for your willingness to share all you’ve learned. We “accidentally” overwintered dahlias last year as we are also zone 6b/7a but it appears we are moving more toward 7a now.
We leave the drip tape in place from season to season unless there’s a line that just has too many holes and needs replacing. Glad you’re finding inspiration in this post! 🙂
This information is exactly what is needed to help flower farmers go organic. The soil is the key and this system lets the soil be.
This is SOOOO helpful! I already dug & divided this year & don’t really want to do that again! And I love the idea of building up the nutrients this way.
Thanks for sharing! This is great! Do you pull the leaves/straw back in April? Could the new plants push through the thick layer of 8-12” mulch?
We leave the straw/leaves in place in the spring. It breaks down over the winter to be just a thin layer of organic residue (about 1 inch thick) by the time we take the tarps off so it helps with controlling weeds until the dahlias get bigger, but it’s not so deep as to hinder them.
Thanks Jennie
Are you leaving the straw much in place or removing it in Springtime?
We leave the straw/leaves in place in the spring. It breaks down over the winter to be just a thin layer of organic residue by the time we take the tarps off so it helps with controlling weeds until the dahlias get bigger, but it’s not so deep as to hinder them.
Do you ever have an issue with late spring frosts killing the foliage that starts to sprout early under the tarps? I’m in Northern MD Zone 6b and we can get those late frosts/freezes, like the one we got in May this past spring. Does that affect the young foliage?
This past may, we got a freeze (went to 31F) here at my farm in Philly on Mother’s Day. That has never happened before in all my years of farming. The dahlias were up about a foot tall. They all turned black. But they rebounded quickly and none were actually lost. Just set us back a few weeks on getting blooms.
would this dieback be considered the first pinch?
Yes, an early spring frost essentially “pinches” the plants. Mother Nature does the work for you!
I’m so curious about whether this would work in a slightly colder zone! I’m in zone 5b, and I think I’ll do a trial patch this way next year and find out.
I’ve heard tell of people in colder zones overwintering dahlias, but I hate to vouch for the success of it and then have someone be disappointed in my advice. But I totally think you should experiment! 😉
I’m in zone 5b and will experiment with this method this year. Thanks for publishing this information!
Thank you Jennie. I am in the UK where it can get to -10deg C (14F) or even a bit colder and it can be wet. I have always dug them up but I might try this next year on a few tubers. thank you
Our winters are cold and damp here too. We go below 0F a few times a winter and we get lots of precipitation (used to be snow, now it’s mostly rain). I would imagine you should be able to overwinter there in the UK. The key really is having the tarps over the beds so the soil says dry.
Can I apply these same principles to dahlias I am digging and dividing to a new space (from a poorly draining space to one with better soil and drainage)?
Thanks for all of your great inspiration for flower growers in the mid-Atlantic!
Sure!
Jennie, when you pull the tarps or signs off the beds, you leave the 8-12″ of mulch on the dahlias, is that right? Do you pull it away from the emerging or pinched stems at all? Many thanks for sharing this!!!
Hey Val! No, there’s no need to pull the straw/leaves off the plants because by the time we pull the tarps off in the spring, the worms/soil biology have done a tremendous job of breaking down the mulch and there’s just a thin residue of maybe an inch or so… which is just enough to keep weeds down but not enough to hinder the dahlia shoots in any way.
Thank you so much for sharing your process! I have two questions. Do you think that it would work as well if each dahlia was covered individually with plastic rather than the entire section? I would love to naturalize narcissus and tulips between the dahlias since their seasons are so far apart. Would the ground around the dahlias become too saturated and lead to rot? We’re in zone 8a/8b sometimes 7b depending on the year, pnw rainy and my soil is loamy to sandy. I don’t expect you to be able to answer this, just wondering what your thoughts are. My other question is on plant spacing. I currently plant 12″ apart, 20 dahlias to a 4×10′ bed Floret style. Would planting 18″ apart, 3 rows staggered in a 4×10′ bed work (still 20 plants). I have a small plot and am always hustling to get as many plants in as possible.
Good questions, Megan. I’m not sure I know the exact answer for the first one. I would say in your zone, you’re warm enough to overwinter dahlias without any trouble for sure. But I have always used big tarps pulled over the entire patch because water has a habit of seeping across the ground, not just straight down. If you’ve got super drainage (which it sounds like you might), you could possibly get away with individual pieces of plastic. BUT, my other concern would be just generally keeping individual pieces of plastic from blowing away. Seems like it could get messy fast. Instead, what I might do if I were you would be plant narcissus in your aisles between dahlia beds and then just run strips of tarp down along your beds but leave the aisles open for the narcissus to use. Then when the summer rolls around and you need to walk between your dahlia rows, you would mow down the narcissus. But I really don’t know if that would work either in terms of the narcissus might get too compacted with walking all summer. Just some thoughts.
Regarding spacing of dahlias, your plan for the 18″ sounds good to me! 🙂
I’ve been thinking more about what I could interplant between the dahlias to limit bare ground as they’re growing in the spring. I’m thinking about experimenting with flax, wheat and bee’s friend. They all grow quickly, upright and with limited spacing. Bee’s friend also seems like it could improve soil as it’s often used as a cover crop for breaking up compacted soil. The second thought I had was to inoculate wine cap mushrooms in the mulch under the dahlias. They seem especially well suited since they can handle some sun. I would love to hear your thoughts. I also love the red radish idea you mentioned for planting with slow growing crops. Do you plant anything with your dahlias? (I scored construction plastic from a neighbors addition that I’ll cut to fit the beds so I don’t kill my living walkways, another brilliant idea of yours that I’m incorporating. I’m so exited about everything I’m learning. Thank you!)
Great ideas for interplanting!! I have not interplanted in dahlias to date, but this coming season (2021), I am going to be trying a fast crop of sunflowers that mature in 60 days. I figure they’ll shoot up taller than the emerging dahlias but won’t cast too much shade (I’ll space the sunflowers out about 12″). Sunflower root systems are fantastic for mining deeper minerals so I’ll leave their rootstock in the ground to decay and release those minerals back to the dahlias. I think the ones you’ve listed would all be great too as long as you can be sure to get the flax and wheat harvested before they go to seed and become a weed issue.
Hi Jennie – how did your experiment of planting sunflowers amongst the dahlias pan out?
It worked great! Will be doing the same this year.
Hi Jennie! Fantastic post, thank you so much! Do you prune back the emerging shoots in the spring so that you only have one strong clump from each plant? My single tuber plantings this year had several shoots that I let stay, and in hindsight I thought it may be wiser in the future to prune to just a single string stalk and use the other sprouts for cutting. Any experience with that? Thank you!
We pinch as described in the post, but we don’t “eliminate” any shoots. Dahlias are meant to be bushy and we get more flowers that way.
Thank you!!
Hi Jennie,
I’m thinking about using old billboards in place of sileage tarps to kill off cover crops for no-till methods. Do you see any issues in doing this as far as chemicals in the billboard ink are concerned?
We use billboards all the time at my farm and I’ve never noticed any issues with ink/chemicals.
Jennie you are the best!!! Thanks so much for taking the time to do this!! I will refer back many times!
PS. If people reading this have never taken Jennie’s Farmer Florist Class…..you should! Her knowledge abounds, she is overly generous with sharing her secrets and amazingly patient in answering all kinds of questions! I learned so so SO MUCH!
Thank you for sharing this information. My tubers are already dug and stored for this year – we had a “freak” killing frost on Sept 18th this year! Pittsburgh area zone 6a.
I love the information about the leaf mold tea! Do you use that in other applications of growing? If so, can you share those or direct us where we can learn more about it?
I’ll be writing several blog posts over the winter about my homemade applications like the leaf mold tea so stay tuned. 🙂
Wow! Thank you for this. I am in 6b in southern CT and we can get some really cold temps lasting several days (the dreaded polar vortex). I would so love to try this (such a time saver in the fall to not have to spend so much time digging and dividing) but would really worry about the tuber clumps freezing and rotting, even with all that protection. I may have to experiment next year on a section to see if this would work here. I just love this idea.
Loving your podcast and this article!
If you perennialize dahlias but then need to move them at a later date, can you still dig up the tubers at the end of the season and store inside again?
Awesome to hear the podcast is a hit! 🙂 Yes, you can absolutely dig up the tubers again after a few seasons if you need to move them or what to increase your stock by dividing.
Thank you for the overwintering part. However, I am needing a bit more help with the initial planting. Do you have a blog post on that part? I have my beds already ready with no dig but it is about 4 inches deep. So my question is how deep do you do the initial planting of the the bed is only 4 inches deep? Or do I put them in as deep as I can and then add additional mulching on top. Thanks.
Thank you so much for this! I’m so excited to try it next winter. I’m curious if you ever dig tubers in the fall, divide them right away, replant and then follow your overwintering steps? I’m still working on increasing my tuber count and it would be nice to “store them” in the ground instead of running my cooler all winter! Thank you for sharing your knowledge Jennie!
Yes, several times we have dug in the fall to quickly divide the clumps of ones we want more of and then replanted them immediately to still overwinter in the ground. 🙂
This is exactly what I want to d oDo you leave them out overnight so the cuts can heal a bit? Or dip them in anything to prevent rot?
When dividing in fall, do you wait for foliage to die back after freeze or cut back while still green and divde and replant? Do you let cut edge dry before replanting?
We let the foliage die from a hard frost before cutting it off. We do not typically divide the plants, but when we do, we just dig, divide and replant in one fell swoop.
This is wonderful! Mine are all coming up (Zone 9b). Hit by frost early and grew right back. To be clear, I have multiple sprouts coming up and they don’t get thinned to just 1 sprout, I should let all of them grow together en mass? Thank you!
Jennie,
Thanks for this. I have left mine in the ground for two years. Larger tubers put up more stems. Does every stem get pinched? So many examples show pinching on a single tuber and not on these larger groups. Thanks
We do pinch all the stems here, but we aren’t very precise about it. I just use a weed wacker and give them all a quick haircut when they are knee high. Since the overwintered plants are so vigorous, you don’t have to be nearly as fussy as you do with a new tuber sending up a single shoot. 🙂
Where do you source the old billboards? Are they free?
They are free and from a local company that does billboard installation.
I love your advice. My fallowed Nd my Dahlias flowered all ready two beuty bloom!😍
Great post Jennie, thank you so much. I am going to overwinter my dahlias this year. I am in 10B and thinking I do not need the tarps. We get hardly any rain and do not freeze here. Any thoughts?
Sounds like tarps are optional for you then. Lucky you! I’d maybe cover a small section with a tarp the first season just to be sure rather than risk all your tubers in one go. But, yep, it sounds like you’re good to go. 🙂
Jennie
Coming across your article about overwintering dahlias in the ground was an eye-opener. I too am in zone 6b (Rhode Island) and have never heard of leaving clumps in the ground, so I was both intrigued and excited over the prospects. The freedom of not having to dig up and store tubers every year, nor starting them in pots indoors before planting them out is an absolute no-brainer!
I have lots of dahlias growing in pots and lots more scattered about the yard. I recently decided to grow all my dahlias in one area to create a cutting garden, so finding your article was music to me ears. That said, do you suppose I can dig up all my tubers this fall and immediately plant them into the area I’ve set aside, and then follow all the protocols you have outlined in your wonderful article?
I’m anxious to hear your response. Thank you,
David
Absolutely, David! They can be dug up to be moved around this fall. Still wait until after a hard frost so the tubers are mature enough for digging. Then dig, divide if you want (purely optional), and replant them in the new space all in the same day. Do not let the tubers sit out of the ground more than an hour or so as you don’t want them to dry out at all.
Happy growing! I wish you many beautiful dahlias in the years to come. 🙂
I grow my dahlias in landscape fabric because of intense bindweed and canada thistle issues. Would I have to remove the landscape fabric from the dahlias before attempting to overwinter them?
The fabric isn’t a hinderance to overwintering, but I would encourage you to lift it sometime to add compost to your beds. Dahlias really like/need organic matter to be happy so you’ll need to do that once per season somehow.
Thank you so much for all of your helpful advice for overwintering dahlias
I’m curious about how to deal with disease in the soil and how to combat spider mites and leafhoppers. They put all of my 200+ dahlias into stress mode. I have used organic sprays to prevent, to no avail. I had very few blooms this year. I am wanting to stay organic if possible. HELP if you can
I’m in zone 8b in the Pacific northwest. Thank you so much!
Please explain the drip line that was mentioned in the comments. I must have missed something! Thanks!
I want to try this but live in 6a and we get quite a bit of snow near the great lakes. Do you think it would be beneficial to also add a low tunnel of frost cloth over the mulch and plastic or would that be overkill? I tried with my ranunculus this last winter and they survived but didn’t do as well as my early spring starts, BUT the soil stayed really dry which is what I’m most worried about losing with my dahlias and ending up with rot. Thanks so much for this valuable information!!
Very useful info re overwintering dahlias..growing in uk on clay soil and sometimes – 14 temp but will certainly try this method to save digging !
One question: Would it be possible to use clear plastic from old HH covering with black fabric cloth on top to keep beds from heating up too much under the clear plastic? Clear plastic would at least keep the beds dry. No access to billboards or siege tarps this year. Great information on your site, as always, Jennie Love. Thank you!!
You could use the clear plastic as long as you then shade it somehow so it does not end up solarizing the bed on bright sunny days and killing your dahlias.
I’m in zone 9b in Northern Ca and want to perennialize my dahlias now that I have a permanent spot for them. We do get frost frequently throughout the winter but never really go into the mid-20s. So I’m wondering if I need to put a silage tarp over them or if a heavy layer of straw will be enough. I am a no-till farm as well.
Hi Heather, I am in Northern Ca also and I am wondering what you ended up doing this last winter. I lost 90% of my tubers to moles last year so I had to take the rest out and this spring we put them in boxes with wire mesh on the bottom. I’d like to over winter them this year and I was wondering about the tarp too, since we get so much sun here in the winter. I don’t want to end up cooking my tubers. So I’m curious what you ended up doing, and if it worked for you this winter.
This is fabulous news! I really did not want to dig mine up. We are zone 7 (Middle-Tennessee) but do get down in the ‘teens once or twice in the winter. Question, our dahlia bed has verbena in it. Do you have advice for how to take care when there are partner plants like that in the same bed? I have read that I should not cut the verbena back, but it seems I will have to in order to use this method for the dahlias. Perhaps it will work to also cut back the verbena in the same method? Thank you in advance for your help.
Hi Jennie. I’m dahlia obsessed and am starting more no-till practices (thanks to all of your helpful posts). I’m too chicken to overwinter my dahlias since I’m in zone 5b/6a. Do you think it’s possible for me to overwinter them? Maybe I overwinter a few and see how it goes? Would you even bother? Thanks!
Try a few and see if it works for your area. I can only speak to my own farm but I’ve heard of growers in colder areas having great success.
I live in zone 8, and it is December 2nd, 2021, we have had nothing but rain. The dahlias stems are all now black and falling over. I want to leave them in the garden. Do I wait for a cold dry spell before I cover, especially covering with the plastic? I am afraid they will rot if a trap them in wet ground. Thank you
In Zone 8, you likely do not need to cover your dahlias with a tarp. But I would still mulch them with leaves or straw to protect the tubers from freezing temps.
We have a lot of mulch, mainly ground branches and a lot of leaf content available. Would it be ok to sub this for the leaves? Or would it throw off the correct soil balance needed for the dahlias? Thank you!
I don’t believe branches would work. The leaves and straw we use here are much more insulating that small branches and woody debris would be. Also, they break down nicely over the winter so in the spring the beds are in perfect condition for the dahlias to start growing. If you were using woody debris, you would need to rake that off the beds. But I could be wrong. You could always experiment with a small section and see how it goes.
Did you end up planting sunflowers in the pathways with your dahlias in 2021 ? If so, how did it turn out?
Yep, the sunflowers were a success and we’ll be doing it again this season!
Thank you for the great info. Would this method work in raised beds as well?. I have mine planted in very low 8″ raised beds due to extremely rocky / clay base with poor drainage..
Hi there! I am so excited to find this resource. I’m zone 6b in NE Ohio, so we get quite a bit of snow and low temps. I grow primarily in raised beds – would this method work in a raised bed?
Thank you in advance!
I am not a novice by any means, so sorry if my question is elementary… Do you need to water them at all? Mine are planted in raised beds and I was considering trying this method, but I wasn’t sure if I needed to do any watering. My beds are bottomless. Thank you!
Jennie, thanks a ton for this great info. I am in Maine, zone 5b (maybe getting warmer, but not official yet). I read that Lori at 3 Acre Farm (zone 5b) inadvertently overwintered “Blizzard” (!) when she left some tubers in the ground and a neighbor piled 2-3′ of maple leaves on top. After removing the leaves in the spring she found the dahlias sprouting and reported that they did great. I would like to experiment with leaving a few clumps in the ground this winter. You put 8-12″ of material on top. Do you think I should go thicker, like Lori accidentally did? Thanks again. for all you do!
Yes, you’ll need to go a good bit deeper. Other growers in Zone 5 who have successfully overwintered have used about 2 feet deep leaves. Good luck! 🙂
Thank you so much for this! I used your method last winter and it worked. Sitting in the dahlia patch and prepping again for this winter with fingers crossed. I appreciate the shared knowledge every time I cut a bloom!
Hi Jennie!
I’m in zone 6b love the idea of overwintering dahlias. How do you deal with gall management? I noticed pulling my tubers a few had gall and im wondering about what to do with the soil that the diseased plants were planted in. What do you do with the space that you are overwintering and happen to find gall? Is it in there forever or can you replant in that spot in a couple of years? Thanks!
Hi Jennie,
Can I divide my Dahlia in the spring after digging them from the ground? I followed your recipe last year, and they survived!
Is it OK to divide them in the spring (once I see some leaves) rather than in the fall? I find it challenging to divide in the fall as the eyes are tricky to see.
Thanks,
Pavan
Sure! The slight downside to dividing in the spring instead of the fall is that you’re not as likely to get early blooms. Instead they will act more like plants that are being treated as annuals instead of perennials.
Hi! I love this info on overwintering dahlias in the mid-Atlantic area. I have two small dahlia beds–4×10 feet and 4×8 feet. Do you think I can mulch using a 3 inch layer of Leafgro compost (the compost made in Maryland) followed by covering the beds with full bags of Leafgro? The full bags of Leafgro would weight down the bags so they would not fly away. I am also thinking of using a section of my clean, used pool cover. It is thick, dark green and waterproof. I have thought of using straw for mulch. Do you know of a source of weed seed free straw? I am concerned about adding weeds with the mulch. Thanks!
I’m not familiar with the Leafgro product, but I can say that regular old leaves collected in the fall do not bring in any extra weeds to the dahlia patch here at our farm. Our dahlias are virtually weed free anymore. So no need to seek out a special source/product.
Hi Jennie; don’t know if you will see this since it’s now 2023. I moved from Phila area to NW Washington state years ago (still miss Philly area!) My area is slug and snail capitol of the USA and my soil is very heavy clay. How do you deal with slugs? I have seen more garter snakes since I started covering my dahlia beds with leaves, straw, and lumber wrap – but I dug them all two years in a row when I saw that rot was getting down in the stems and tubers.I cut hard on them and I wonder if the rot from the rains is getting into the hollow stems.
I kept my tubers in an unheated storage unit in containers with sawdust and wood shavings and they got hammered – it froze in there two yrs in a row with record low temps in the teens – last yr my medium was just damp enough to form ice! Even this year in dry horse bedding shavings with the containers covered in blankets, they still froze and rotted. I was heartbroken. I lost favorites that I can’t even find anymore.
Now i never want to dig them again! So fed up with all that work only to lose them all! so I hope you have answers for how to repel slugs (and voles) without pesticides – and I intend to try this method and maybe only dig a very few favorites. I love the garter snakes and want to encourage them, even though they also eat frogs and salamanders and other beneficials. Slugs though… they are so tough to deal with! . Thanks for any help you can give on slug and snail control. So happy to find your youtube channel and this blog!
Hi Sadie – I did have a horrid slug problem before I adopted regenerative practices and stopped disturbing the soil/environment so much. Since I’ve perennialized my dahlias, slugs have diminished greatly because of what you have already started to observe there in your own space: the predators come when the ecosystem is stable. No only garter snakes but ground beetles. Ground beetles are voracious slug hunters, both of adults and eggs. But ground beetles hate disturbance so they won’t come into a growing space that’s subject to heavy mowing, tilling, digging, etc. The toads and salamanders will come too and eat slugs.
For a few years I did employ an organic product called Sluggo Plus to help get keep the slugs in check. But I don’t need that anymore now that the natural predators are there.
Regarding voles/moles, I’ve not had any issues with them in my overwintered dahlias. I have two cats that live outside on the farm and are constantly on the prowl.