As a follow up to my last post, No-Till Flowers Farming: The First Step to Regenerative Flower Farming, here are some practical lessons on no-till farming, be it flowers or other crops. Important to note is that we use the “deep mulch system” here at Love ‘n Fresh Flowers, which is a scaled-up version of lasagna gardening. There have been many bumps along the way in my experience with no-till farming, which you’ll read about some below, but it’s been so very worth it!!!
No-Till Farming Lessons Learned (so far):
Lesson 1: A deep mulch system may conserve water ultimately, but it’s critical to regularly irrigate newly planted transplants!
I learned this one the hard way and lost a lot of transplants in 2019. We use a lovely screened and aged compost to mulch our beds and had been putting about 4” of compost on top of each bed before transplanting (our transplants are grown in 128 trays). The roots of the transplants were therefore mostly surrounded by compost and only just touching the soil below. We did make sure to get the roots down to the soil surface at least, but that wasn’t enough. Compost is very prone to drying out and can actually become quickly hydrophobic. Therefore, the transplants would dry out to the point of desiccation and would not recover if they didn’t get water daily during the first two weeks while they were getting their roots established down below.
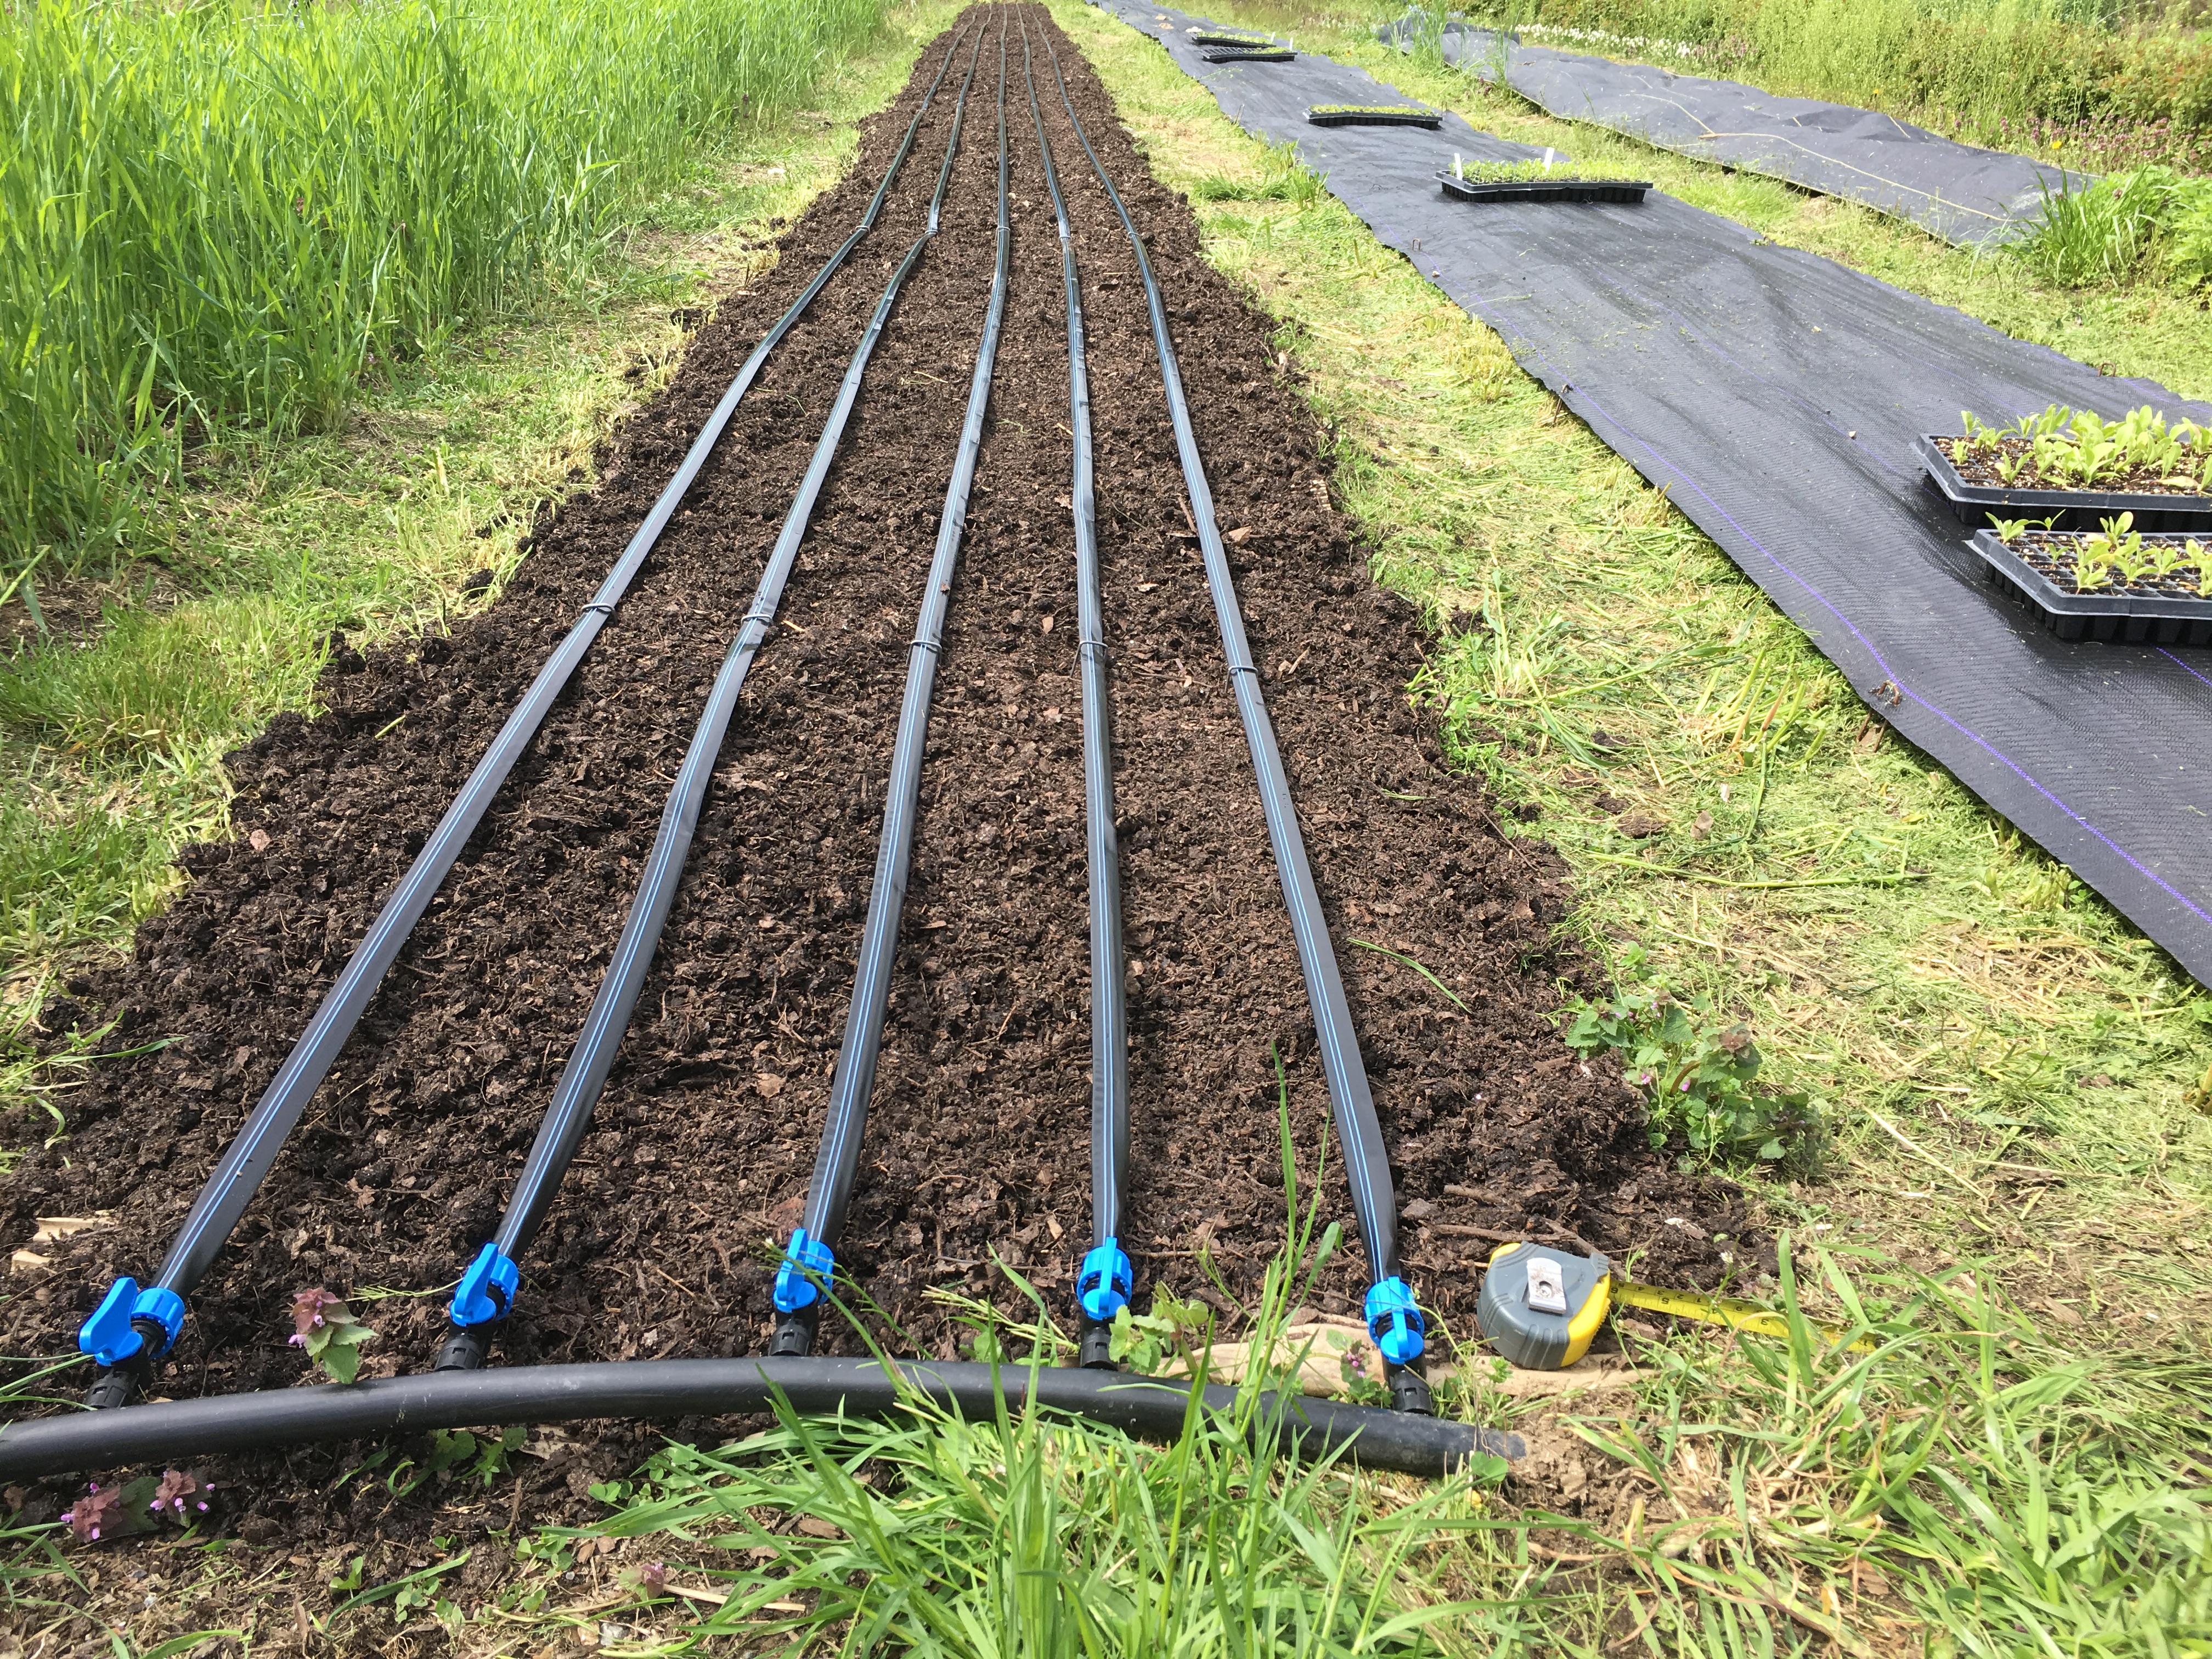
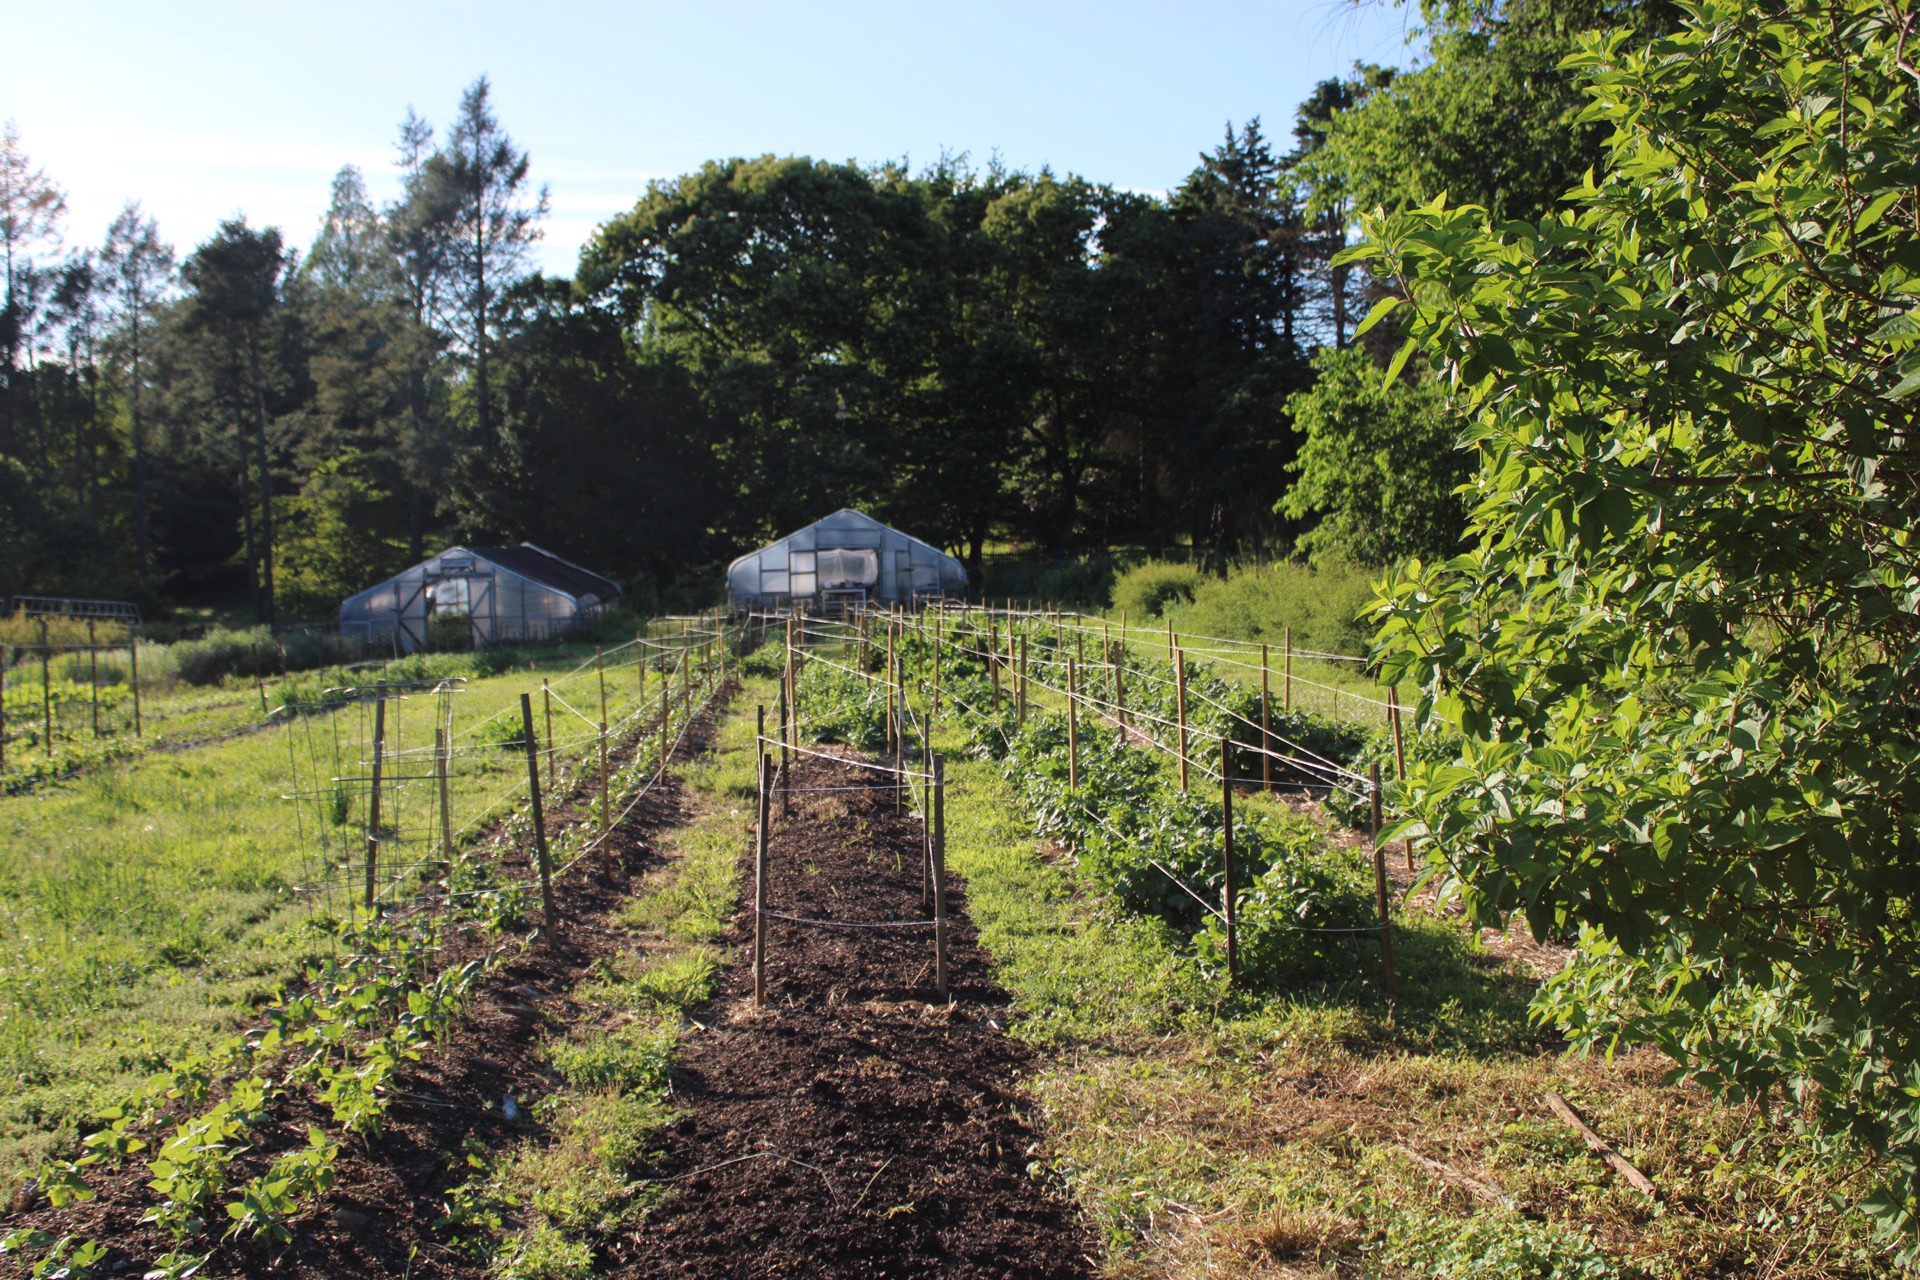
The solution to this problem was to first, realize what the problem was and acknowledge that a deep mulch system does not mean you don’t have to water. It actually means we have to water more often when beds are newly planted! Lesson learned. After realizing the problem, I also reduced the layer of compost to be only about 2” thick so more of the transplant root ball could get into the soil itself at planting time. And instead of the three lines of drip tape on each planting bed that was previously the standard at my farm, we now lay five lines of drip tape. Since we plant five rows per bed (our beds are 36” wide and rows within the beds are 6” apart), that means there’s a dedicated drip line for each row of transplants. This may seem like a lot of extra work and materials, but we offset that by using the drip tape as our guide for planting rather than running twine as guidelines (which we used to do) and the tape remains in place all season long (since no tilling happens) so we only have to do this once each spring. The resulting transplant vigor is well-worth the extra investment.
I’ve also been experimenting with overhead watering (sprinkler system), which I have always avoided as a flower farmer since conventional flower farmer wisdom says to never let moisture get onto flower petals. While that rule of thumb is still very much true, I find overhead irrigation is much better for transplant health as it keeps the compost on the beds more evenly moist (and therefore also more biologically active). The hope is that by getting the plants established with overhead irrigation initially, no more irrigating will be needed once they develop enough canopy of leaves to shade the soil in the bed, at which point the tenant that a no-till deep mulch system conserves water would truly come into play. So far this is looking likely, but I haven’t followed this approach for an entire season yet so can’t say for certain that it will hold true throughout a hot summer. If it does, then I will skip putting down drip tape in future seasons and rely instead only on overhead irrigation until the crop sets buds, at which point all irrigation will cease so as not to damage the flower petals. I have been trying to reduce plastic use around the farm, at least plastic that can’t be used for many seasons before being tossed. Getting rid of drip tape would go a long way towards that goal!
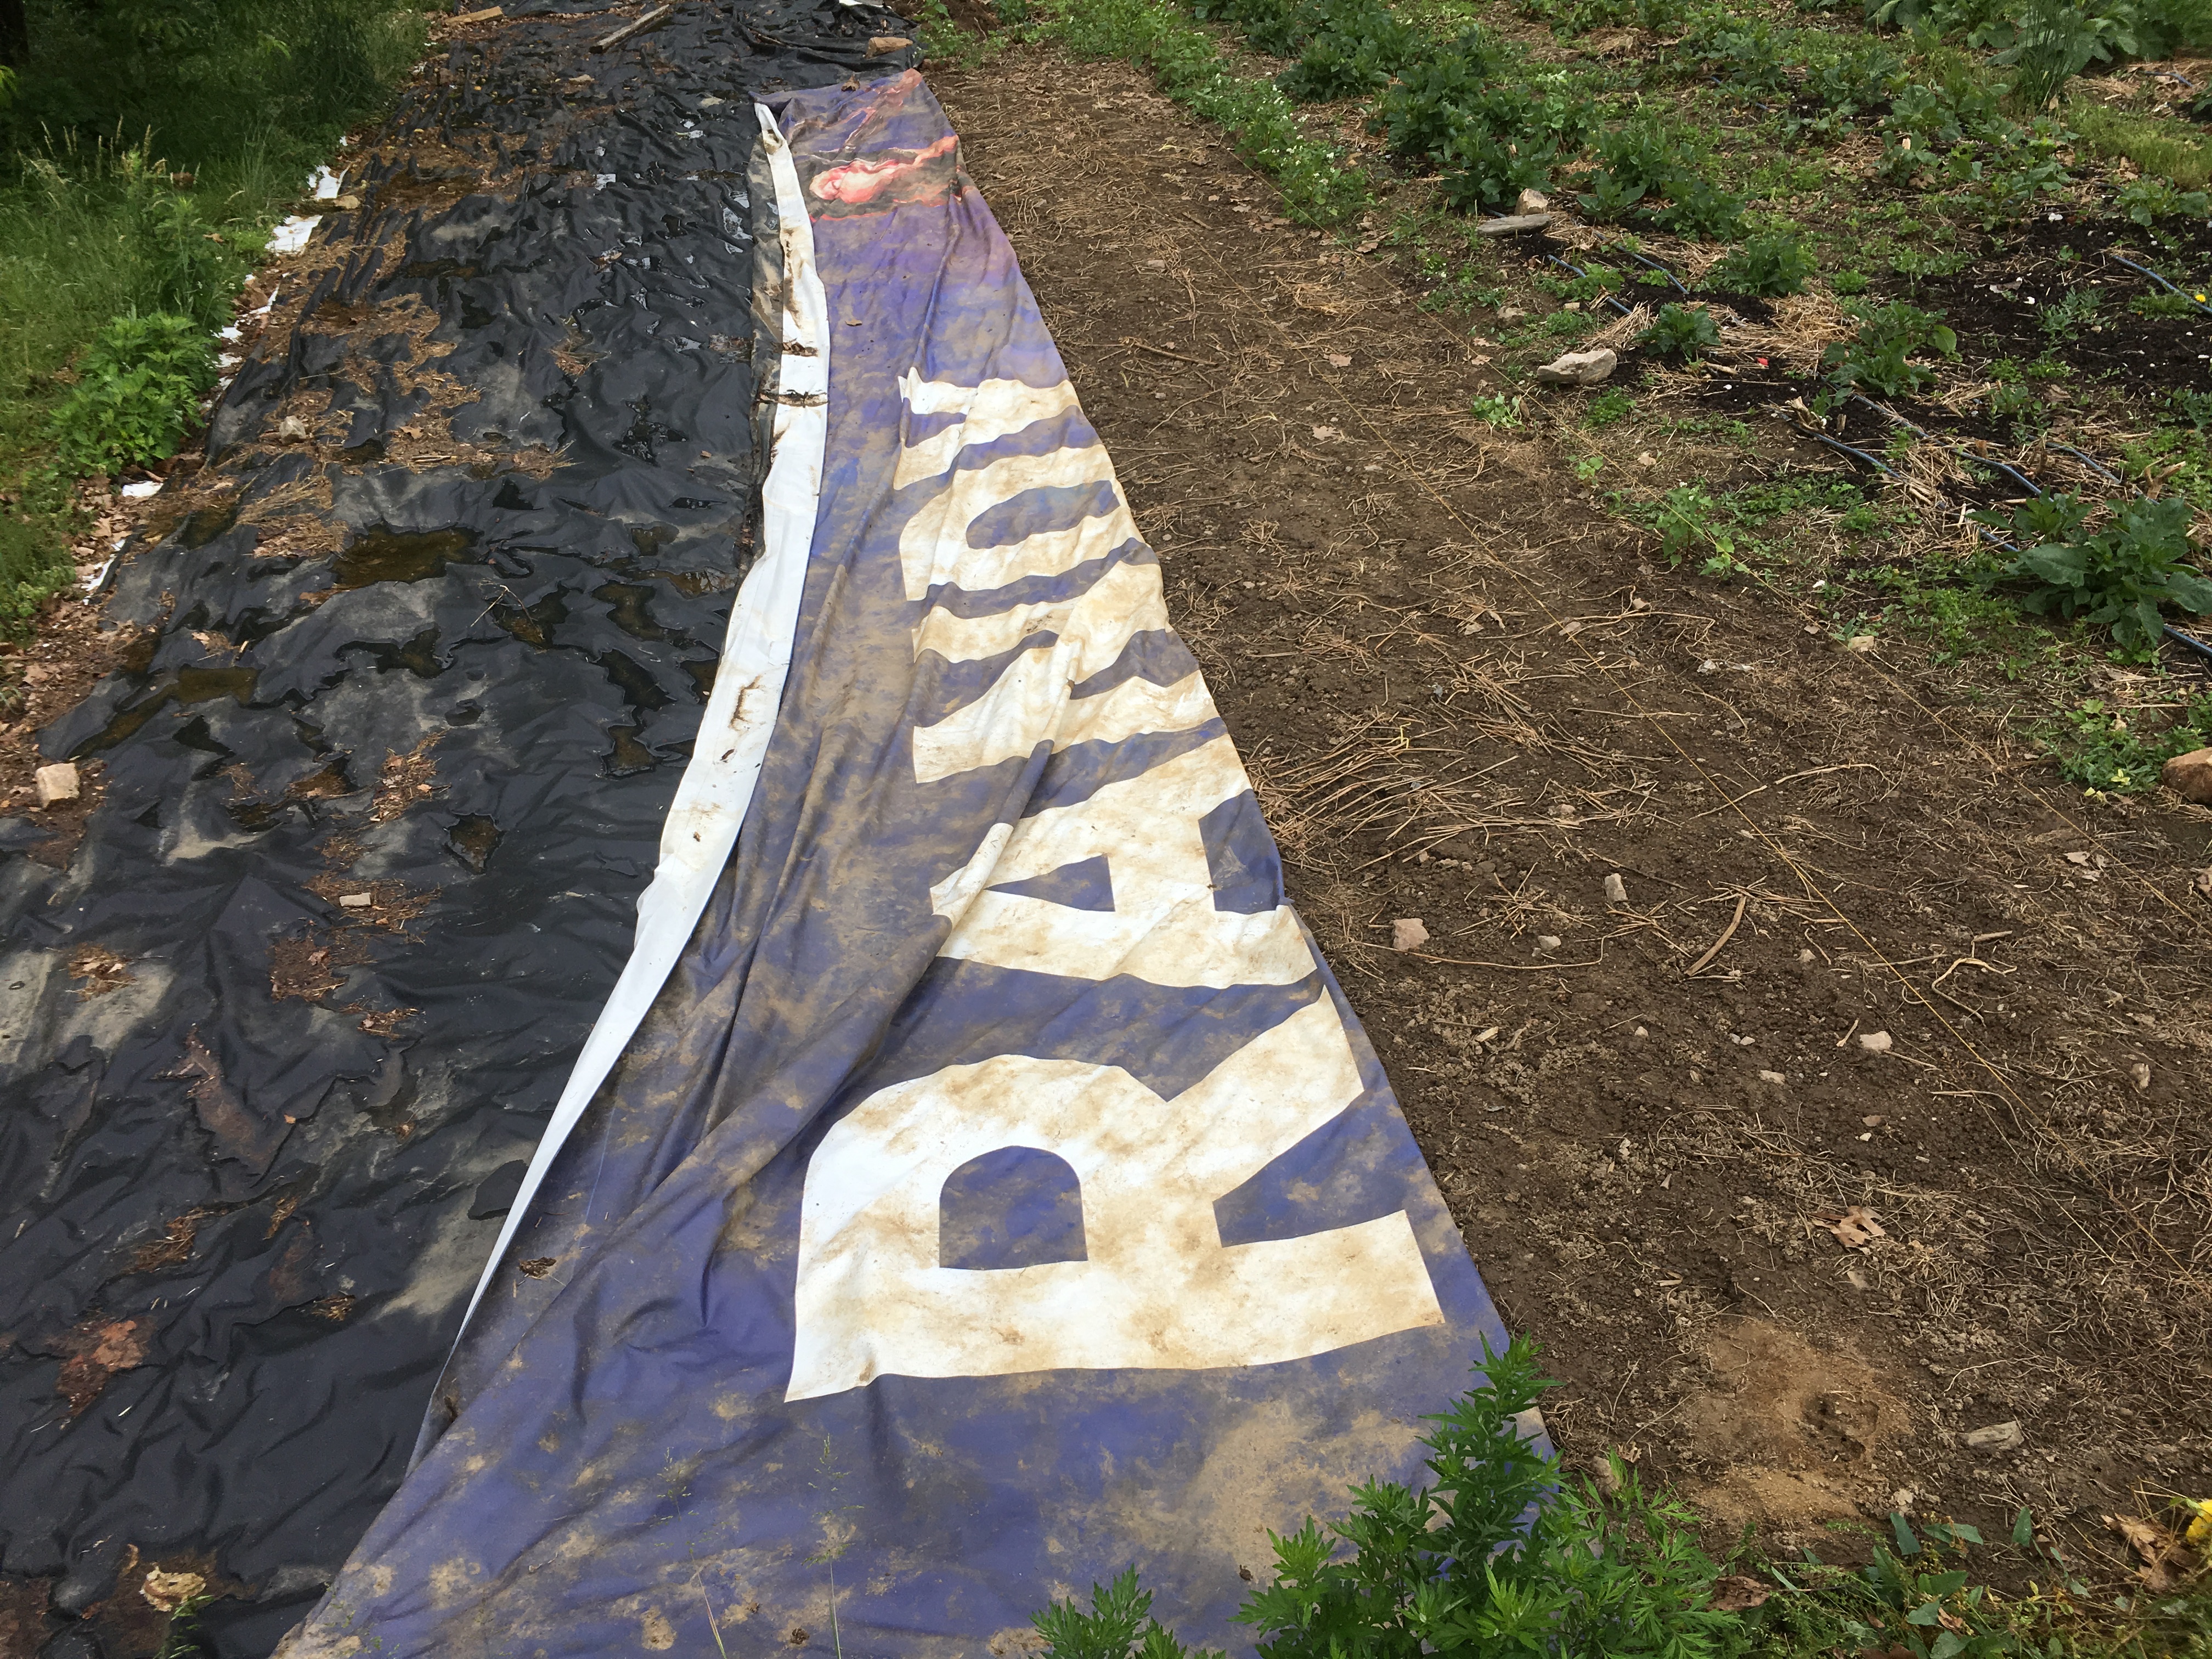
Lesson 2: Definitely put drip tape on top of the compost (not under) and as close to the young transplants as possible.
Originally, we were placing the drip tape under the compost, thinking that would help the moisture get down to the soil better. But then we damaged the tape a lot when planting, slicing into it with trowels/soil knives. And, hearkening back to Lesson 1, it meant that the compost itself did not get moistened during irrigation, which meant it really became hydrophobic. Not only did young transplants dry out and die as a result, but also whenever it rained, the water would just sheet off of the compost instead of infiltrating it. By having the irrigation lines on top of the compost, it means the compost doesn’t get so hydrophobic.
As with all types of farming, in no-till farming, keeping the irrigation lines as close to the young transplant as possible also means they truly get water right at the roots and irrigating can happen over a shorter period of time, thus conserving water.
Lesson 3: Up the planting density!!
Wow! This may be the biggest eye-opener I’ve had with no-till farming. I used to plant most of our annual crops (i.e., zinnias, cosmos, etc.) at 9” to 12” spacing. That was recommended by the seed suppliers and all the reference books. But that left a lot of bare soil for the weeds to grow up between the transplants. Even when the zinnias got big, lots of sunlight was able to filter down into the soil, and weeds were still able to grow. The soil also tended to dry out a lot because it was far more exposed to the sun’s rays.

In doing research as I started down the path of no-till farming, I listened to the some no-till farming and regenerative farming podcasts that talked about planting density and how that could really be something more nuanced in a no-till farming system. Nature really hates bare soil. That’s why weeds grow!! Anywhere we, as farmers and gardeners, do not plant, Nature is going to plant something for us in the form of a “weed”. The reason for that lies in the symbiotic relation between plant roots and the soil web of life. Photosynthesis in plants creates sugar exudates which the plants use to barter with the fungi in the soil for nutrients or water the plants can not access themselves. The fungi (and many other organisms) depend on the plant’s exudates (as well as the decaying root sheaths naturally shed as plants grow) for food. It’s a win-win relationship that is fundamental to the functionality of our planet. Thus, Nature is motivated to keep as many living roots in the soil as possible at all times. Weeds are not “weeds”, but rather critical cafeterias for soil life. If you don’t want what Nature plants (“weeds”), then you need to plant more of what you do want!
With that powerful bit of knowledge now in my brain, I’ve been experimenting with closer and closer planting density since my soil is becoming so much more robust without tillage. Many of our annual flowering crops at the farm are now planted at 4” spacing! At this density, the ground is quickly shaded, which reduces the number of weeds tremendously and the soil stays much more moist once the canopy is established. And since the soil is being fed by so many living roots, the crops planted at greater density are actually much healthier, sturdier, and more productive! Yield per square foot has vastly increased. I had plans to expand the acreage of the farm by another acre in 2020, but am now sitting tight with the 3.25 acres we already have in production since no-till farming means we can put twice as much into the same amount of space as we were.
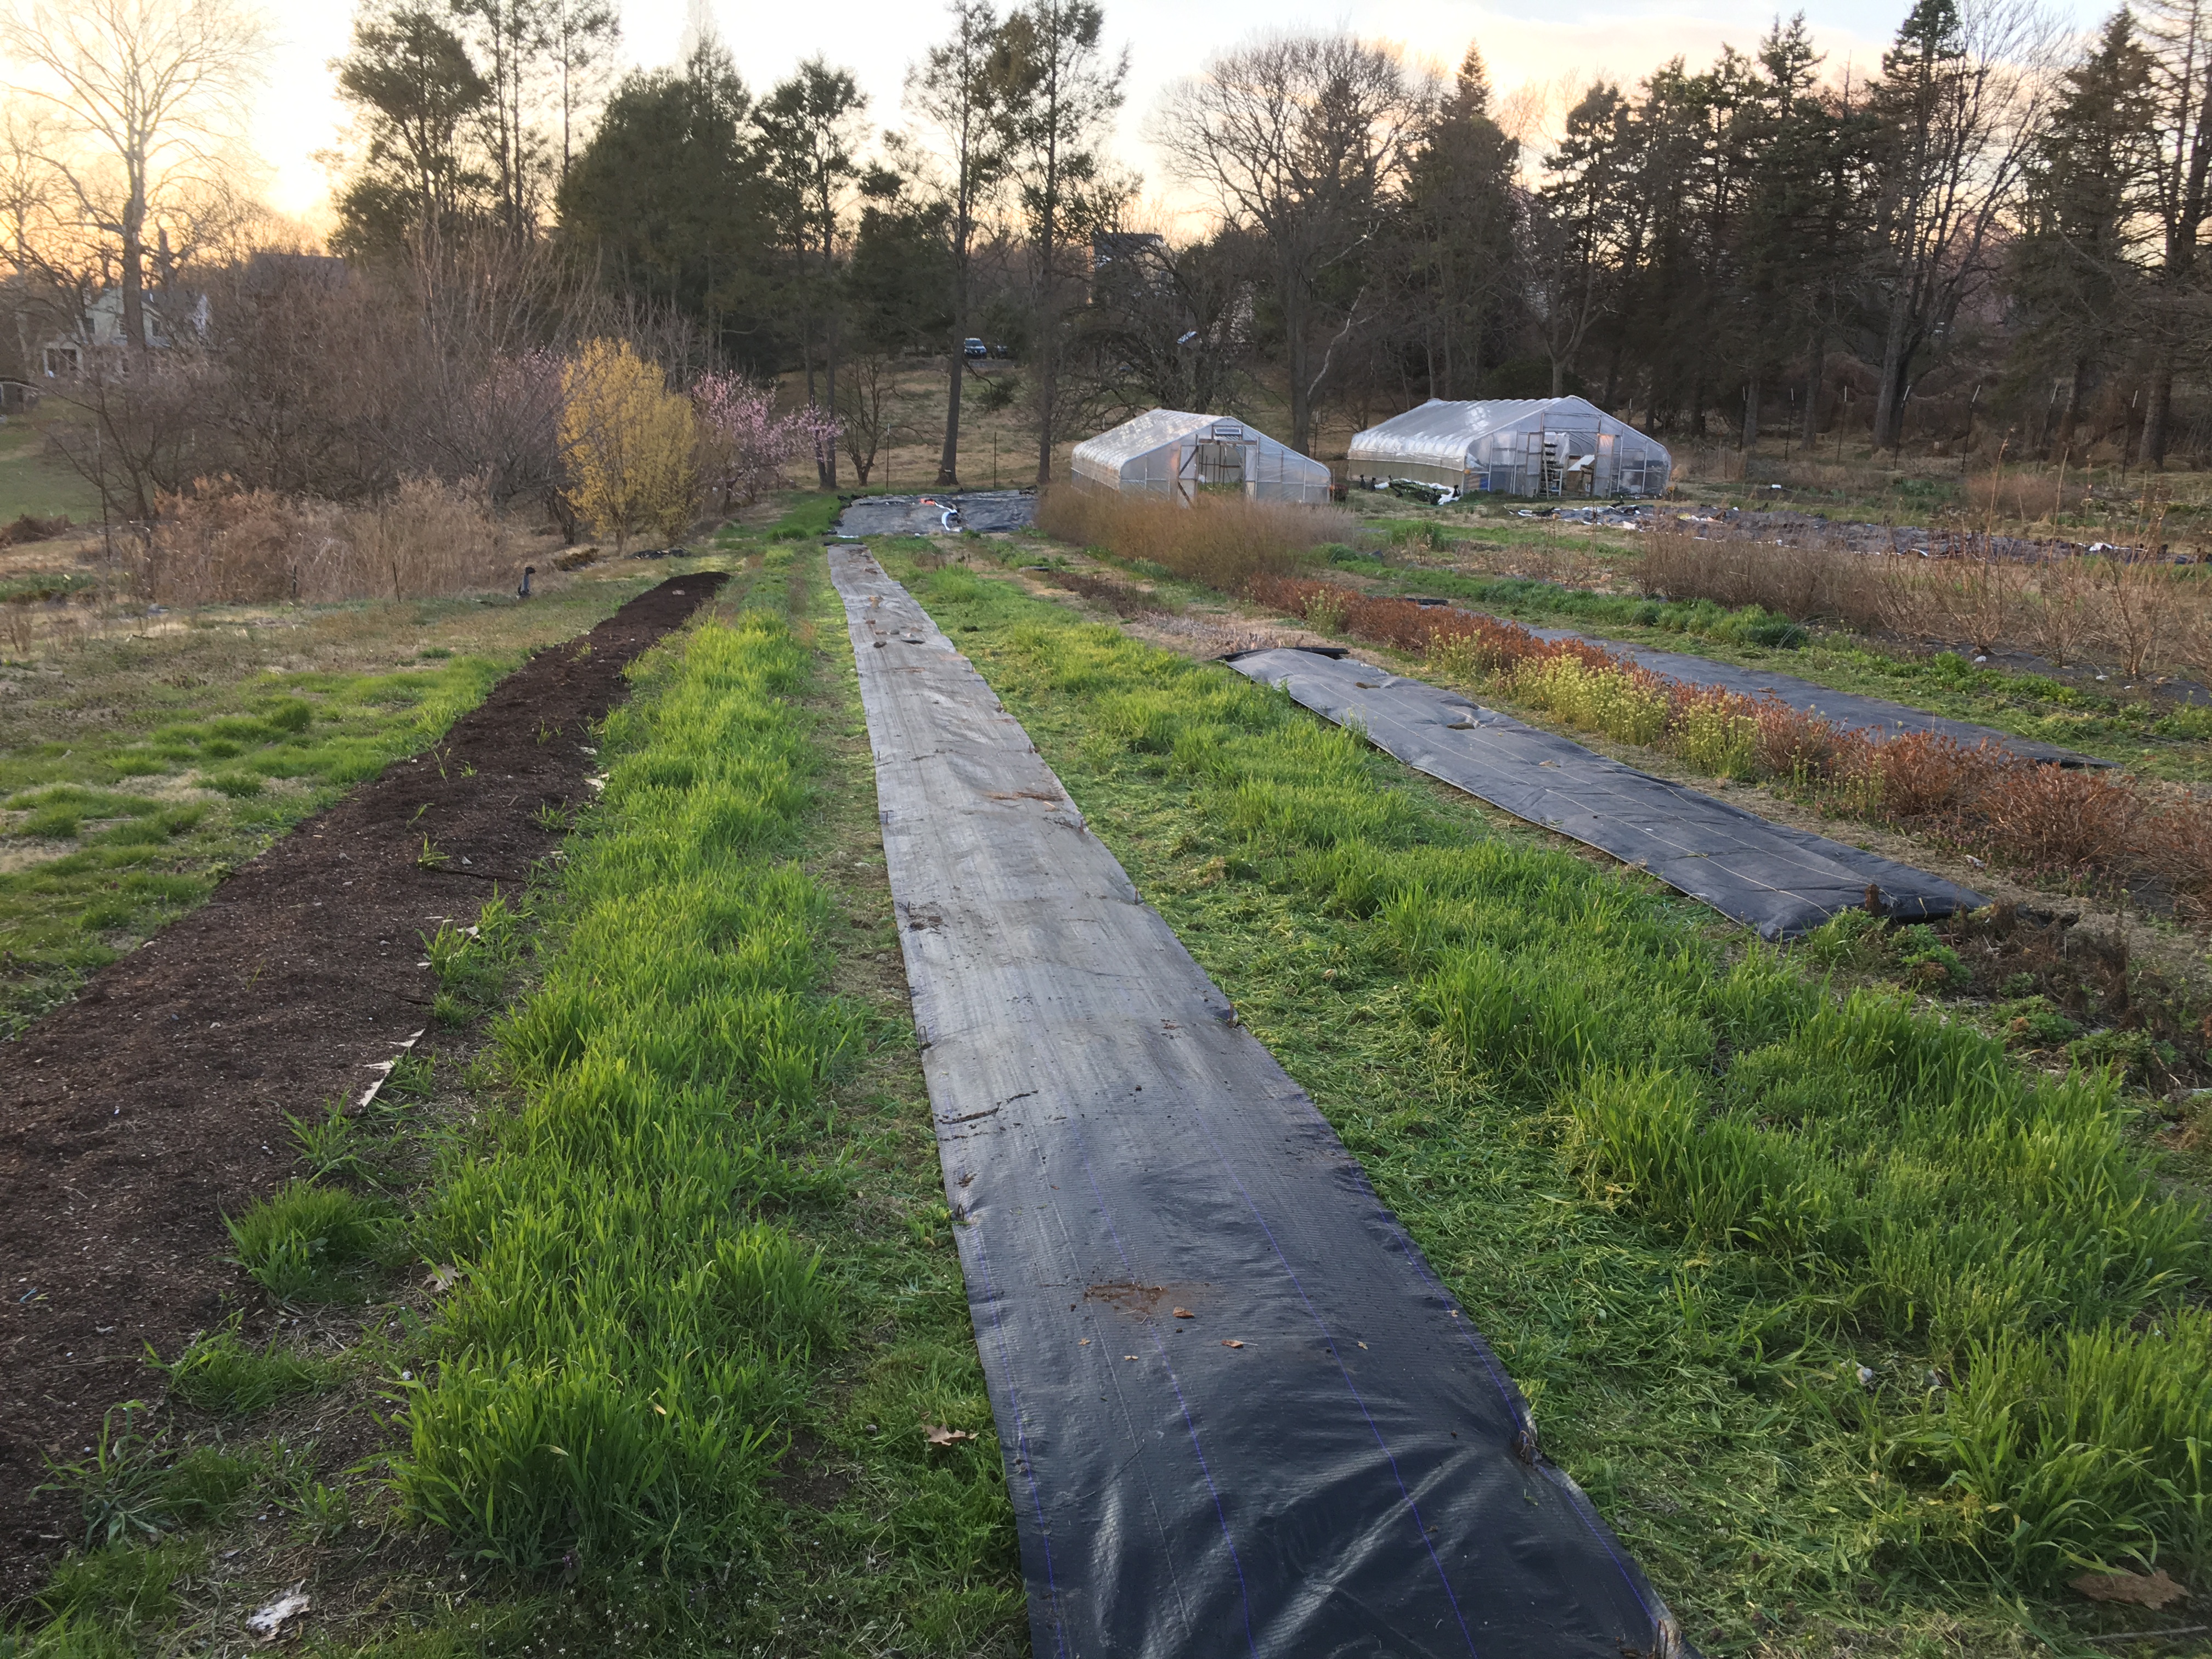
Lesson 4: Be cautious and thoughtful when using tarps!
Tarps, both clear and opaque, are an important tool talked about a lot and frequently used by many in no-till farming. Tarps are used often to terminate cover crops and suppress weeds in a modified version of “stale bedding”. I’ve struggled with tarps on both a practical level and on a philosophical level when it comes to no-till farming.
I’ll start with the philosophical concern. Given everything I wrote above about soil life and how Nature wants living roots in the soil at all times, tarps are directly counterproductive to all of that. While many advocates for using tarps in no-till farming will say that the tarps don’t overheat the soil itself and that soil life will survive the time under the tarps, tarpping certainly has to cause serious stress on the soil web since it is robbing it of all sugar exudates from actively photosynthesizing plants. Most no-till farming practitioners are using impervious tarps to exclude all sunlight from the plants they are trying to kill. As such, the tarps are also excluding all rainfall from the soil, creating a near-instant desert. No food and water, even if only for a few weeks, sounds like hell to me.
As such, I’ve ceased to use tarps except to open up overgrown ground that is covered in large and intensive invasive species such as wild grapevine, multiflora rose, and Aralia spinosa. I use tarps in this instance because the alternatives would be spraying a strong herbicide multiple times and/or tilling aggressively and repeatedly to weaken those tenacious plants.
Now, instead of using big silage tarps for terminating cover crops or for “pausing” a bed if I’ve screwed up my timing somehow with transplants, I only use black woven landscape fabric, which is porous and allows water through to keep the soil moist. A notable additional benefit is that the landscape fabric we use is 4’ wide, which makes it very easy to move around (versus the giant heavy tarps). And, perhaps more importantly, we just cover the rows themselves rather than an entire swatch of the field, which means the soil life gets an emergency exit nearby in the remaining grass covered aisles to get away from the sudden change in their ecosystem.
My goal is to never have the landscape fabric on a given row for more than 10 days. My goal, surprisingly, is to NOT kill the cover crop under it, but rather just weaken it so that when we mulch over it with cardboard and compost to establish the bed for planting, it won’t have the life force to regrow, but it also wasn’t stone dead and therefore left the soil devoid of a food source for an extended period of time. Additionally, the living (but slowly decaying because they’ve been greatly weakened) roots of the cover crop will “nurse” the baby transplant that we are planting. The microorganisms that had bonded with the cover crop roots, since they haven’t been killed by aggressive tarpping, will still be there to “jump ship” to the new transplants, instantly giving them a support network to gather more nutrients and moisture than they would be able to all alone.
Lesson 5: Don’t remove the terminated crop’s root system when flipping a bed. Plant new transplants right next to those old roots.
Coupled with that sentiment above, we no longer rip out previous crops before planting new crops. Instead, we simply cut down the old crop at the base (using hand-snips or a string trimmer depending on the crop), leaving the entire root system in the ground. This means the soil is not disturbed at all. Then we plant the new transplant right next to the roots of the old crop. I’ve observed remarkably better transplant health and growth as a result (little-to-no shock). And – bonus! – bed flipping is so much faster and a less backbreaking effort this way!
Lesson 6: Cover cropping has opened my eyes to the immense benefit of polycultures and intercropping.
I’ve got to do an entire blog post sometime on cover cropping, including which ones we use at the farm and exactly how I’ve come to easily terminate cover crops without any big equipment. But that’s for another day. For now, I just want to mention that observing how much healthier the soil was after having a diverse mix of cover crops rather than just a singular cover crop (i.e., just winter rye versus winter rye, vetch, cow peas, and clover), I’ve come to really understand the immense benefit of polycultures and intercropping.
I have been experimenting with intercropping more in the 2020 season, and I’m really loving the results. One that I can confidently say has worked well since they’ve reach maturity and have been harvested is agrostemma interplanted (direct sown) with snapdragons (transplants). I’ll be reporting on a few more that I’ve tried once I see how they yield.
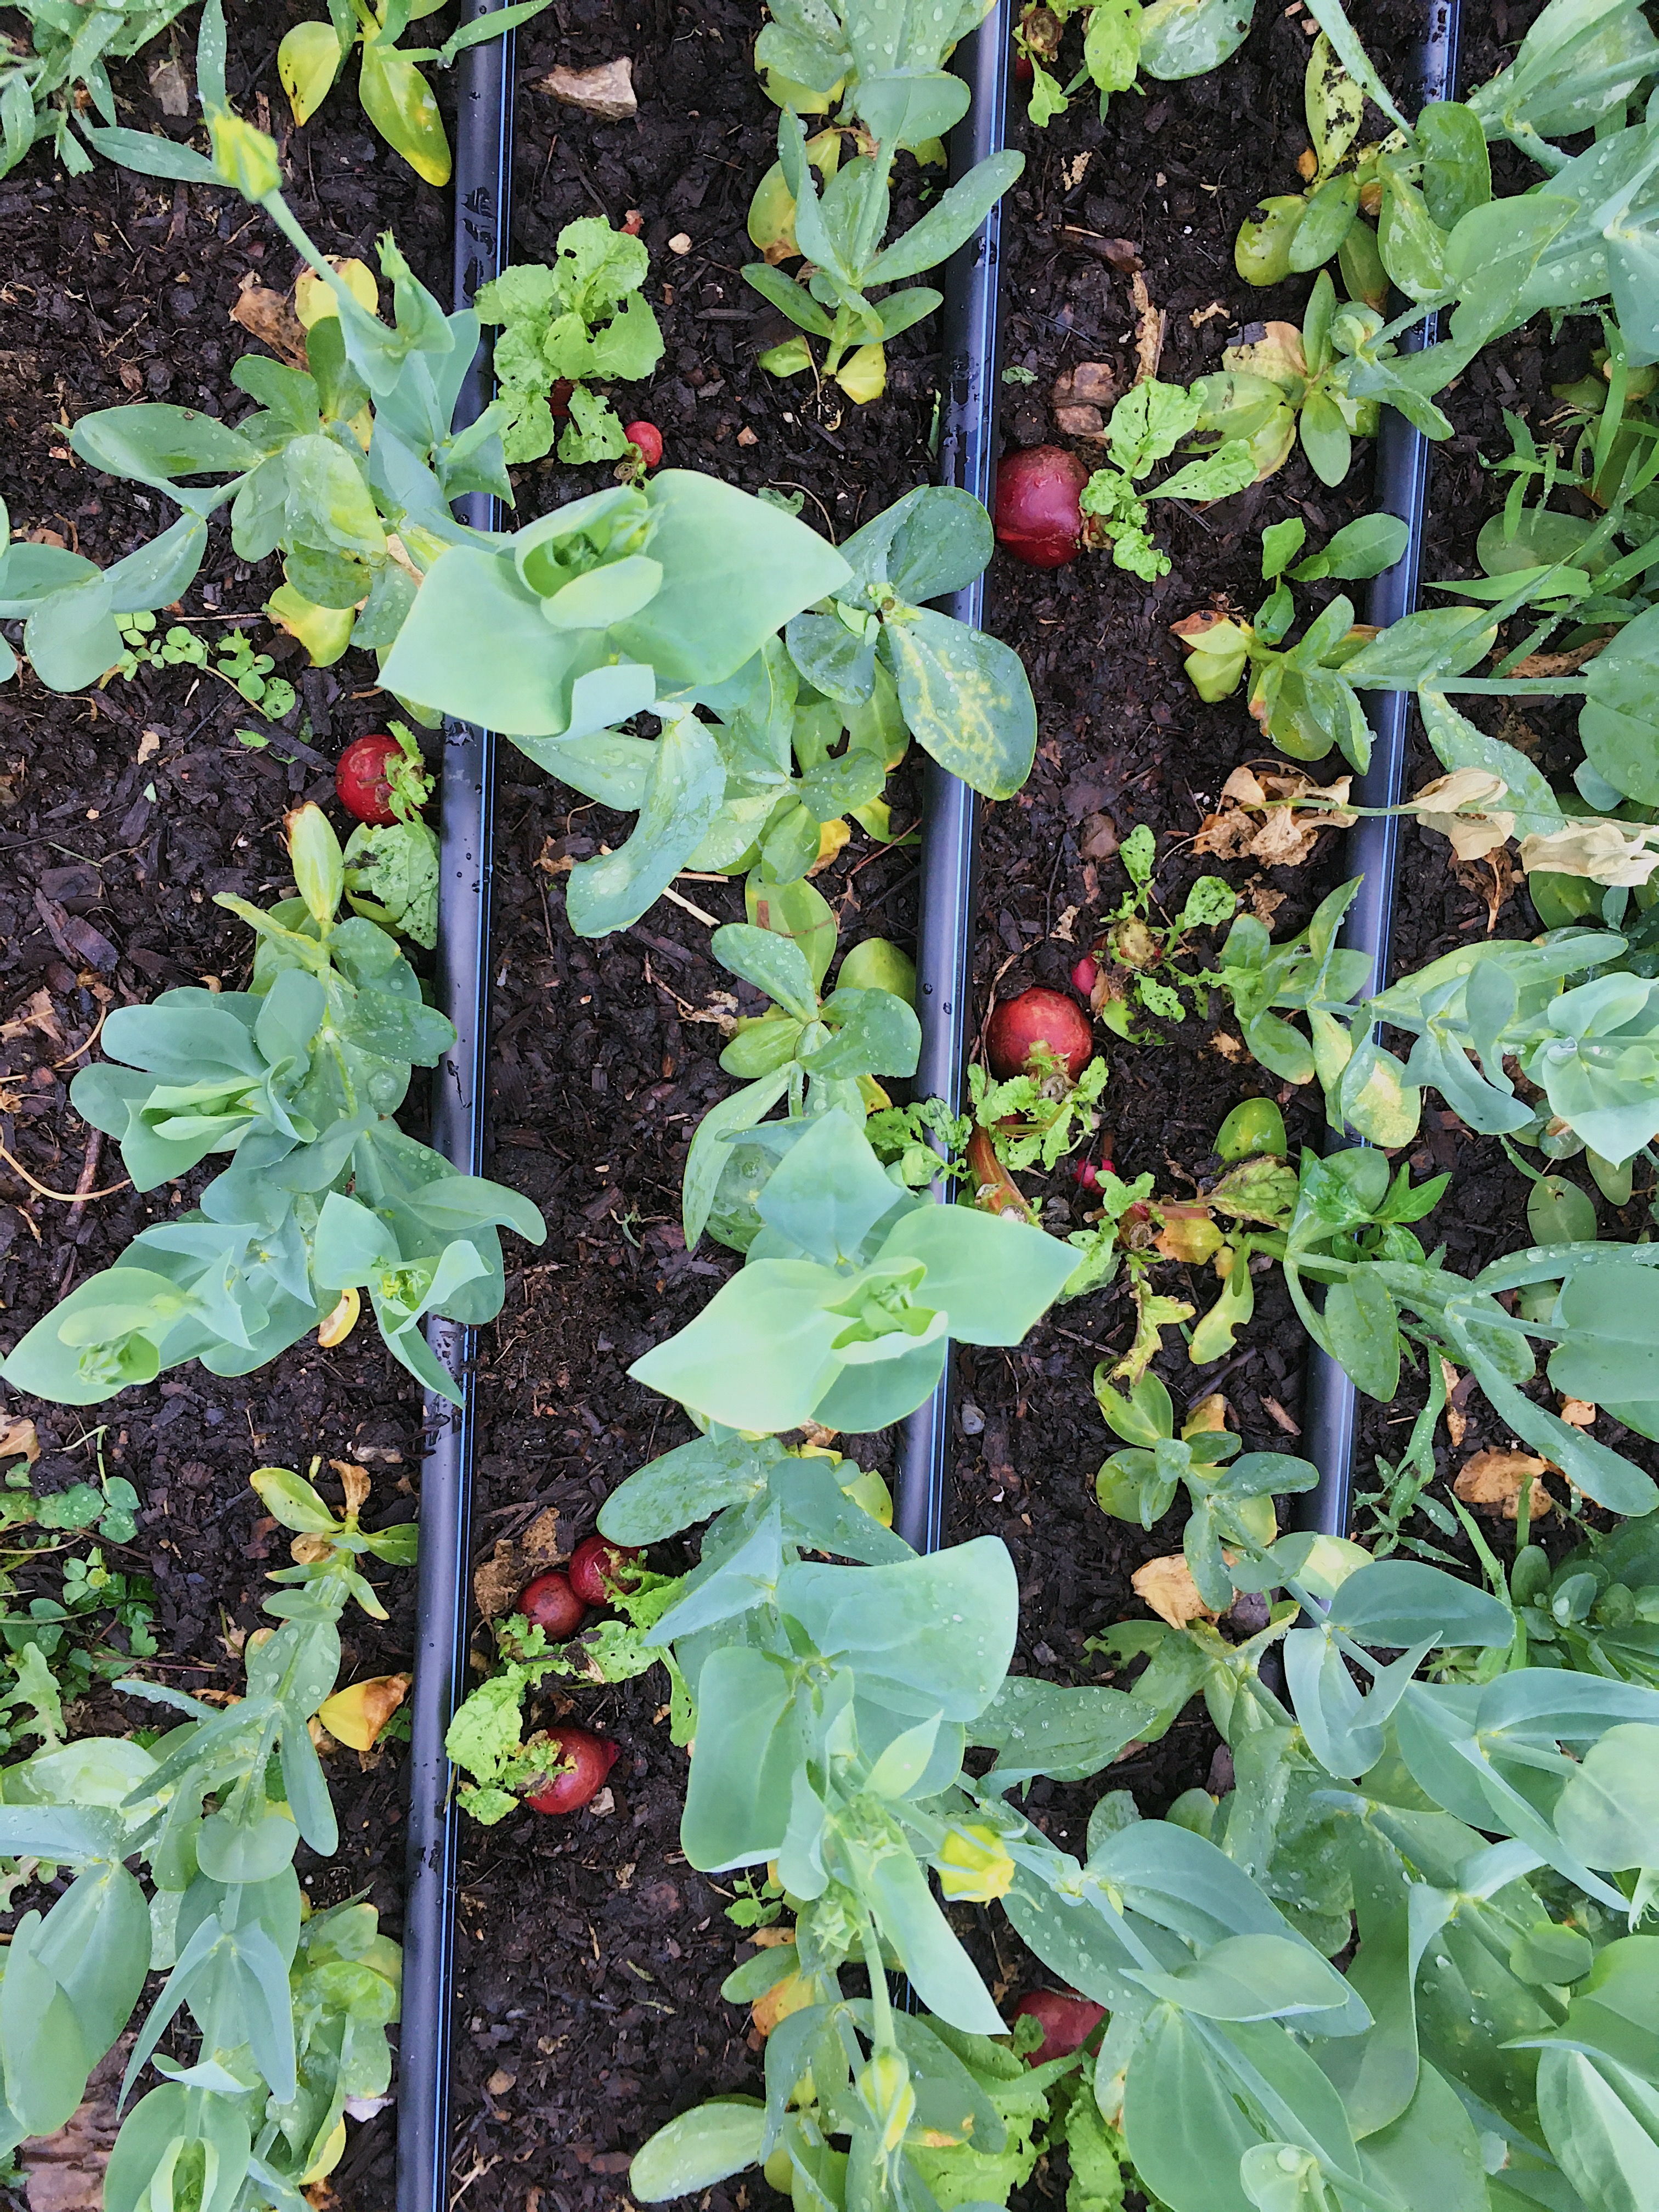
And I’ve taken to direct sowing radish seeds into any beds where the transplants will be slow to put out a canopy of their own. The crop I trialed this on the most this season was lisianthus, a infamously slow grower. Intercropping with radishes (which were sown into the bed immediately after the lisianthus were transplanted) has been tremendously effective for reducing weeds in the beds and has also been fun to have a bit of food to harvest. The radishes aren’t a cash crop for me at all; simply, I want them to create a big root that will then decay and release nutrients back into the soil as well as provide some quick canopy while the lisianthus are slowly puttering along. I’m using regular red radishes (cheapest bulk organic seed I could find), not tillage radishes, which I think would be too big for intercropping with lisianthus in particular. When the radishes start to bolt, we cut the leaves off at the base and have just left the radish bulb to rot in the ground. I’ve never had better-looking lisianthus in my entire farming career and I’m so excited to see them bloom in just a week or two!!!
Lesson 7: Most crops like a deep-mulch no-till system. Some really don’t!
Another lesson learned the hard way. Most of our flower crops thrive in the deep mulch system. However, a few notably hated it and suffered a lot as a result! Those were lisianthus, celosia, basil and eucalyptus. The lisianthus is a bit of a mystery, but the other three make sense now that I thought it through. They are heat loving crops that want warm soil. When we created beds for them in 2019 with the deep compost mulch in May, the soil was still cool and the mulch over it meant that it stayed cool for a long time. These heat lovers hated that and were very stunted.
In 2020, to avoid this problem, I changed two things. For beds that would be planted in heat-loving crops, I put black landscape fabric on them for 5 days prior to establishing the bed (before mulching even). The goal was to have the black fabric collect and trap heat to warm up the soil. Then, immediately after removing the fabric, we put just 1” of compost on the bed (plus the cardboard) and planted right away. The eucalyptus, celosia, lisianthus and basil are doing MUCH better this year as a result!
Lesson 8: Weeding definitely still needs to happen, but it’s much faster!
So there’s this notion that no-till farming means you won’t have weeds. I’m here to testify that that is decidedly not true. At least not in the first few seasons! But what I can say is that the process of removing weeds is so much faster!! A crew of three can now weed over an acre in one afternoon now that we are no-till farming!
I see two reasons for this increase in weeding efficiency: 1) with the dark compost on the bed, we can much more easily see the weeds than we would if the soil was tilled and light brown so we can zip along rather mindlessly. 2) Weeds pull up much easier out of the loose compost on top of cardboard than out of our formally very compacted clay/loam dirt. Especially things like crab grass and dandelion!
And while there are still a lot of weeds at the farm, I have noticed a substantial decrease in crab grass, which used to be one of our biggest “bad guys”. Tilling would chop up crab grass into a million little pieces that could propagate to become new clumps. Crab grass also loves depleted compacted soils. So with tilling out the picture and the soil loose and loamy with life, the crab grass is dwindling. Hooray!
So, there you have it: Eight important observations for anyone starting out on their no-till farming journey. Please feel free to share some of your own observations in the comments below so we can all learn together! And if you’re looking to learn more about no-till farming, I highly recommend you check out the podcast No-till Growers with Farmer Jesse.
Inspirational post! Thank you for sharing. I’d love to hear more about how you start a bed.
Best regards
Thanks, Noelle! 🙂 There’s a blog post up from last year about how we have been building beds. Here’s a direct link: https://lovenfreshflowers.com/2019/05/30/no-till-flower-farming/ We have tweaked this method a bit to make it more efficient, which I hope to write about sometime soon. But the general approach is still very much the same.
Amazing, Jenny!
Thank you so much for sharing your experience and knowledge. I recently completed an online Organic Horticulture Specialist certificate this past Spring and much of what I learned is what you’re sharing in regards to no-till farming practices. The program taught us all about the soil food web, how plants absorb nutrients and the symbiotic relationships that exist in the soil. My favorite quote from the course material was when a women referred to the soil as “the Universe below our feet”. That image makes me so happy and has stuck with me as a complete truth.
I created a bunch of lasagna garden beds this year and am also learning by trial. It means a lot to hear another farmer’s experience with this approach, so thank you! I too am trying to spread the word about this technique for gardening.🙌🏽
I’d love to hear more about where you took that course, Aimee! Sounds awesome! “The Universe Below Our Feet” is such a good visual for the magnitude and depth of life in the soil that we are so completely unaware of as blundering humans. Let’s keep shouting it from the rooftops!
Hi Jennie (I realized I spelt your name incorrectly in my last post, so sorry),
I’m located in the interior of BC, Canada and the course I took was through Gaia College (located in Duncan, BC). The course was 4 months with weekly modules and covered quite a bit of ground, everything from the soil food web and soil structure to tree pruning techniques, organic lawn care, and landscape infrastructure.
I’ve shared my knowledge with a few friends, however, no-till is a counter-intuitive approach compared to what most of us have been brainwashed to believe is the “right way”. A lot of people questioned this system when I started talking to them about it, and I basically had to show everyone how effective it is by doing the no-till method myself and letting them do it the hard way (then comparing results). I finally have some believers now! Haha.
Thanks for swinging back around to share all of this, Aimee! Now I wish I lived in BC (this is not the first time…). 🙂
I agree with you: a lot of people don’t believe that no-till is waaaaaay easier and more effective. Takes a little “show and tell” to convince them. That’s my goal with blogging about it more. So glad you’re winning over new converts up there! Keep up the good work!
Thank you so much for taking the time to share your knowledge with us! This is so helpful!
Happy to do it, Sarah! Grateful for others who will listen and start down a more holistic path for farming/gardening themselves! 🙂
I love all your suggestions! Have you followed Richard Perkins? His veg farming methods are similar to your no-till approach.
I haven’t stumbled on Richard Perkins yet. I’ll look him up. Thanks for the suggestion!
Jennie,
Where do you purchase the giant roll of corrugated cardboard? Someplace like Uline? Btw, I love your blog and IG account!! Wish I was closer to you so I could take a class one day!
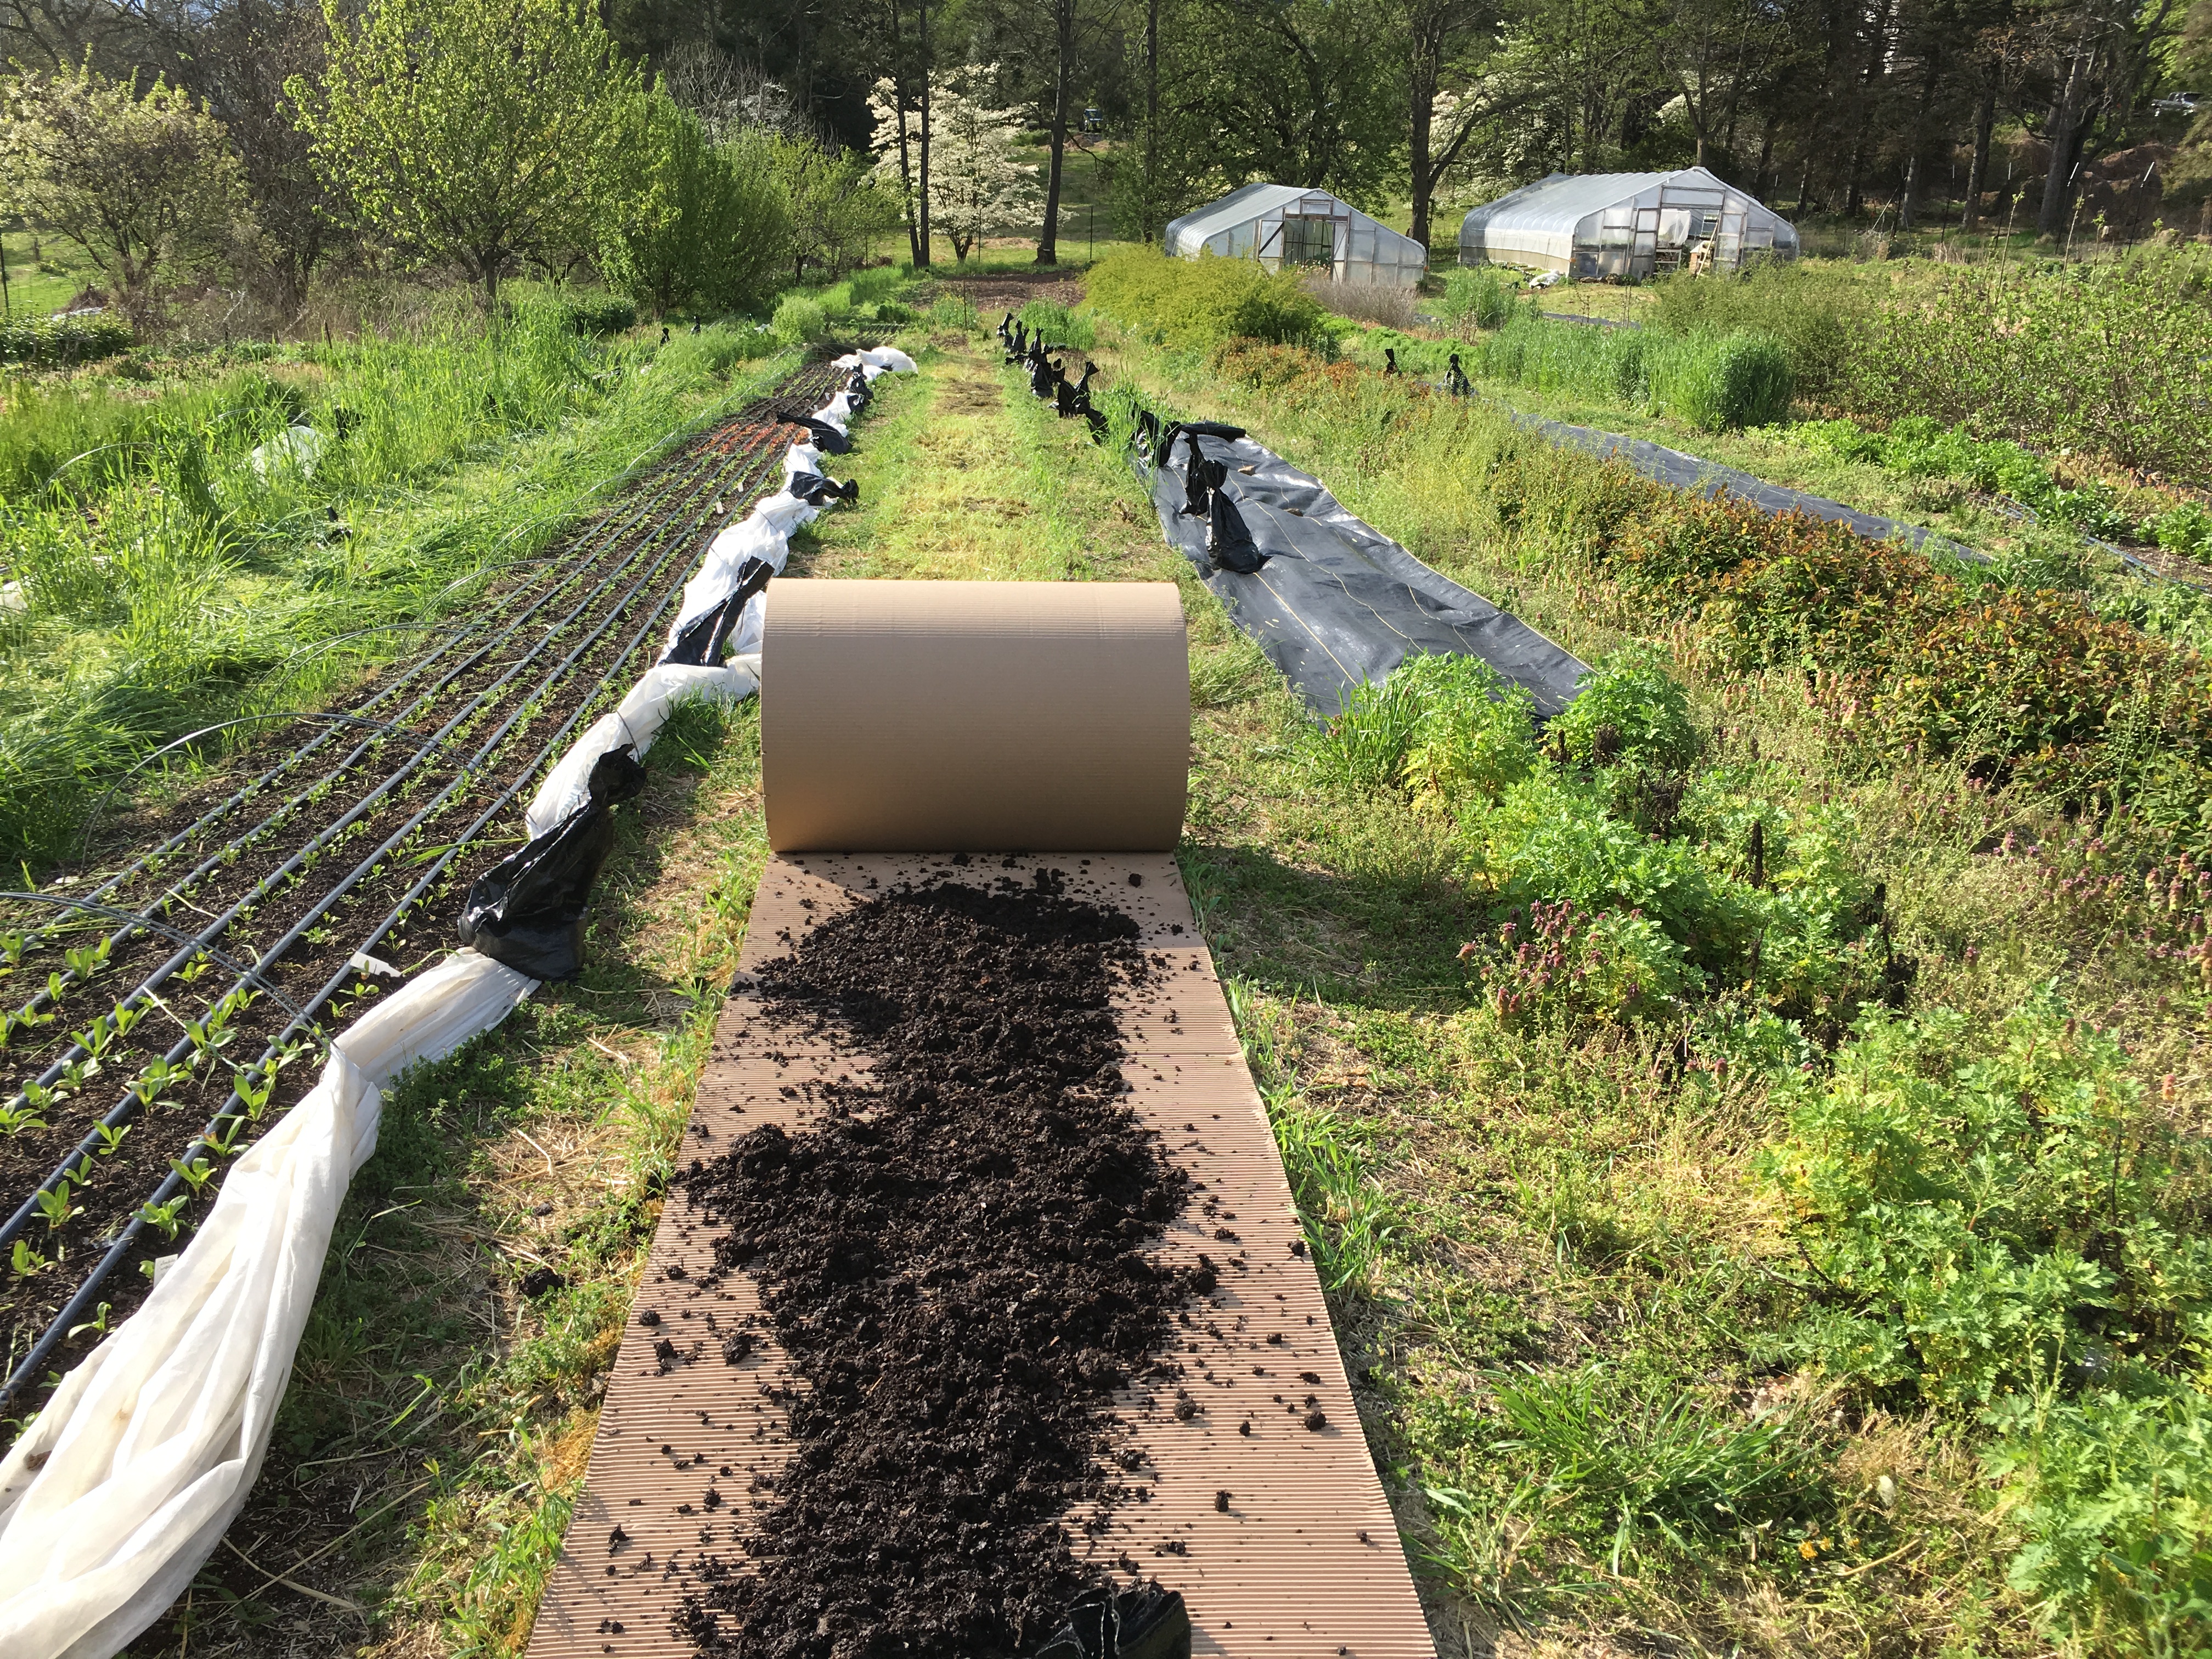
Yep! Uline carries a 36″ corrugated roll that we use to make bed prep fast and uniform. 🙂
Good post! Lots to think about.
Question: where do you source those rolls of corrugated cardboard?
In the past we used recycled cardboard we got out of dumpsters at appliance stores, but that source fell through when COVID restrictions stopped new appliance sales for several weeks this spring right when we were making our beds for planting. So I purchased the rolls of 36″ wide corrugated cardboard from ULine in a pinch. Turns out I like this system way better and we’ll be sticking to it.
Looking around at Uline and other places for the large rolls of 36 or 48″ corrugated rolls but it seems quite expensive! Have you found a place or a way to make this more cost-effective? I DO like the idea of having it all nice and uniform with the rolls…
The price of the rolls has gone up considerably thanks to Covid supply chain issues in 2021. Recycled cardboard boxes pulled from dumpsters at appliance stores or bike shops is your best bet if you’re trying to cut out this expense.
I really enjoy reading all the information you put into this blog post. I’m working with very very small space. Literally .2 acre. I have 18- 4’x40′ rows. I use landscape fabric. This approach you have may increase my planting space tremendously. I have such a tiny area that I’m trying to work with that I’m considering quality over quantity but I feel so limited. Is there any advice you can give on planting in such a small space?
Thank you so much for the great insight!
My husband and I are going to start building our urban micro farm in Berlin, Germany in two weeks and will avoid tilling. Loved hearing your input on the podcast! May I ask about the spacing you have worked with? You said 4 inches for most annuals. Which ones are the exceptions and what’s the spacing there?
SO excited! After studying traditional horticulture and never quite “feeling” it, everything about no till, supporting soil life, making our own fertilisers with native plants and so much more.. it just makes sense intuitively.
I’ve never seen rolls of cardboard! We just save cardboard and pull it apart to use, but the rolls look so much easier and worth the additional cost. From what I understand, you put the cardboard down on top of the chopped cover crops or soil and then anywhere from 1-4″ of compost on top of that. Are you needing to poke holes in the cardboard when you’re transplanting so your plugs touch the soil beneath? Do you have a trick to make that an efficient process? Thanks for al the great info!
Hi Jennie, Thanks for posting this. Second season flower farmer in Tomball, Tx. We are wanting to move to no till method but we have such heavy weed suppression. This past spring we used landscape fabric but I hated how it covered up so much green space. Two questions:
1. Is cardboard hard to cut through to put in transplants? What tool do you suggest?
2. How do you keep the grass from overtaking the edges of the beds?
Thank you in advance for any advice.
Stacey Emmott
Cardboard is very easy to plant through. We use long screwdrivers to poke a whole through the cardboard and then give it a wiggle to create a hole big enough for the transplant to go through. Fast and easy.
We use an edger on our beds a couple times a season to keep the grass from creeping in too badly. In August we usually have to do some hand pulling too because the crabgrass is pretty wicked then. I wrote a whole blog post about living pathways if you want to check that out too.
We’ve been attempting no-till flowers for a few years too and have also found that double layers of builders paper (available at big hardware stores in the paint section) work in a pinch for when we run out of the rolls of cardboard! We’ve been struggling to find an edger that works well with the grass along the beds, keep breaking down and we end up using shovels – do you mind sharing what one you’re using?
Good tip about the double layer of builders paper. We use a weedwacker to do edging… either just with the strings or with an edging attachment, depending on what point in the season it is and how tenacious the weedy stuff might be.
Do you ever seed cover crop with your direct seeded hardy annuals?
No, I’ve never intercropped the two. I would be afraid the cover crop would outcompete the hardy annuals, but I could be wrong.
Thank you for this information!!! I’m only sorry I didn’t read about before my hubby removed the grassed off a portion of our field to plant a new veggie harden this year. I will be doing this for a new perennial garden I am planning!!! Loving your posts. Thank you for your generously sharing your knowledge.
Thanks for all the info on this! I’m wondering if you came to a conclusion about overhead watering vs. driptape? I would love to hear that overhead watering until flowering starts is enough!
You mentioned in your first post about no-till that you weren’t sure how direct seeding would work in this system. I assume you’ve tried it by now, and I’m curious if its worked out!
I have read about soil and regenerative agriculture extensively, attended NOFA seminars, watched dozens of videos and have practiced no-till in my garden for many years. I say that not to brag, but to let you know that when I say you are a very good writer on this subject you are near the top of a very large heap.
I look forward to reading more of your posts and ask that you address cover cropping, in particular. Practical examples of cover crops at garden-scale are hard to come by.
Oh wow! That’s a lovely compliment! Thank you, Rob. I’ve got a blog post drafted on cover crops that should go up soon. I’ll add some garden-scale examples to it. Thanks for that suggestion!
Thank you for sharing all your wisdom! I love all these thoughts. This year I decided to convert the first 10 feed of our front lawn to 2 rows of fillers and perennials. I had to find varieties that are deer resistant, as it’s outside of our fenced growing area. Since I decided this in the fall, I decided to take a no till approach. Taking bits and pieces of things I had read and heard, I mowed the lawn very low, covered it with shredded leaves, then cardboard, then compost, and finally a thick layer of woodchips. Now that it’s spring, I am raking back the woodchips, and using a pro-plugger (love that thing) to take out plugs of soil where I’m going to plant. Then I fill the hole with a mixture of compost and peat moss and plant my plugs into that. Hoping this will work well this year! The plugs coming up look like pretty good soil, and I’ve definitely seen some good worms as I work. I’m hoping the grass continues to break down under all those layers, while still allowing my new plantings to grow into the surrounding soil. It’s definitely a good no till experiment, and it it works well, there are many other lawn areas that I will think about converting in this way!
Hi Mollie! This is exactly what I’m thinking of doing with my own front lawn, and I’m curious how it worked out for you! Did the grass completely die back?
Hi Jennie!
Any tips on figuring out which flowers need more than 4″ spacing? I would assume that sunflowers could grow with a 4” spacing but not sure how to determine spacing for other flowers.
Kindly,
Melanie
For me it’s just been a process of experimentation over the past couple of seasons. I don’t have a comprehensive list yet of what does and doesn’t do well at that tight of spacing but most annuals here at my farm seem to do fine at 4″. It will depend on how “alive” your soil is and if it has the nutrients to support such tight spacing. Also how much air circulation your space gets is important to consider. There is always a breeze/wind at my farm which is up on high ground. If my farm was in a more sheltered area or a low spot where air did not move as freely, I would probably not be able to plant as closely because disease pressure would build up. So just consider your own space and then do some trials at closer spacing and see how it goes. 🙂
Old post but you are a true hero to the flower farming world. Was so psyched to see your piece in the latest specialty cut flowers association magazine!
Nobel prize of flower farming. ❤️ 🌎
Loved this article, very eco conscious. I would to be put on your email list for future articles. I have a sterile field left fallow by previous owners, my goal is soil building with compost, castings and cover crops and of course with the no till method!
Regards,
Tonda
Just curious if woodchips could be used for the walkways? We are cutting down a maple tree and would have access to plenty of chips! Also how did your overhead watering work out? Would love to save money and time if I wouldn’t have to buy a drip line system. Thanks!
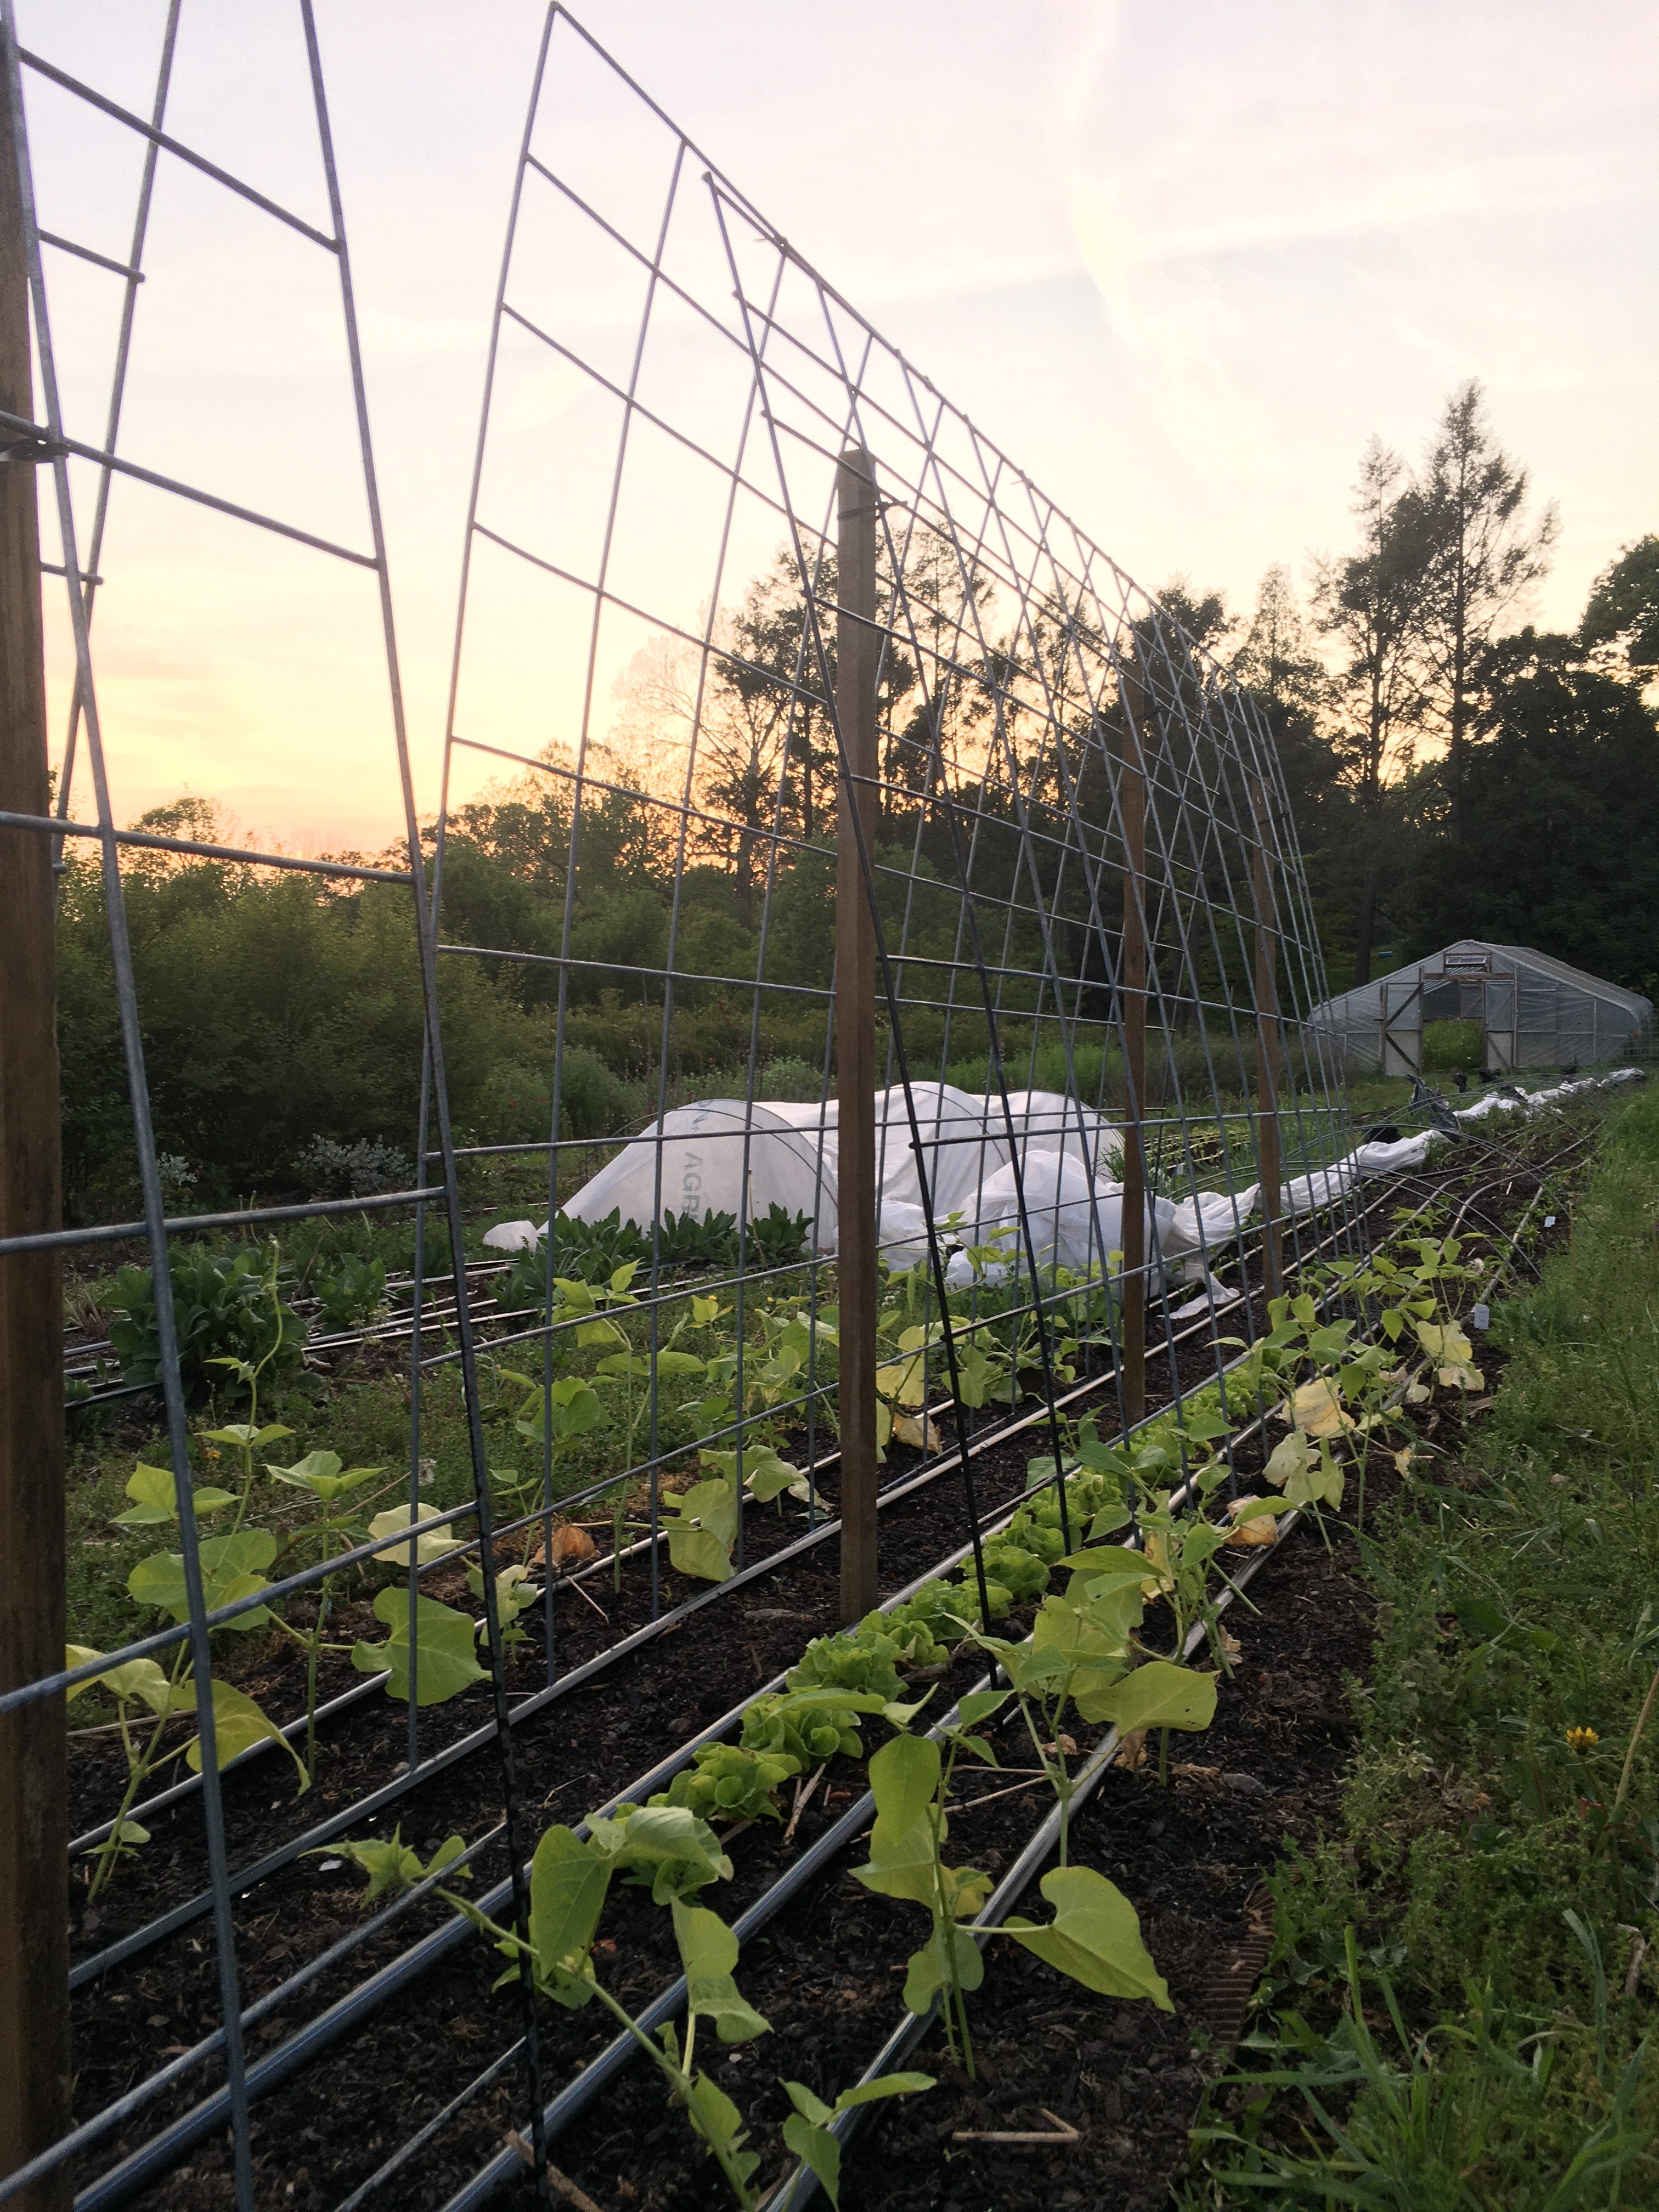
Such great info, thank you!!! Couple questions, is the metal trellis in the photo for Sweet peas? Do you use only metal or any plastic netting? I’m just starting out and wanting to be thoughtful about what I buy. Second question, I worry about the grass growing into the beds. But is it because of the cardboard that it doesn’t? And after your crop is done you cover crop to prevent grass from growing in? Thank you!
Hey Jennie! Thank you so much for all your wisdom and experience that you share here. I am intrigued by how you plant many flowering annuals with a 4″ spacing. Which annual flowers do you grow with this spacing? I sense this would embolden many to plant more densely 🙂 Forgive me if this is already listed somewhere else on your website.
I’m brand new to the cut flower world and have enjoyed many of your valuable farming posts- ty! I had heard about using cardboard on top of soil and adding compost, then planting into it. After struggling for a long time to prep beds in my heavy clay soil, I thought this sounded like a brilliant solution. Unfortunately, I must have done something wrong. Most of my transplants just didn’t make it getting planted in the cardboard- in particular the sunflowers. I did water everyday, but they just seemed… stunted. Not sure where I went wrong, but will try again- This time with the added organic fertilizer recipes I found on your site. Ty!
Hi!
I’m curious how you do your dahlia beds, as I saw a comment somewhere that you wouldn’t use the cardboard/compost method for dahlias. Is there a blog post about that somewhere?
Thanks!
Yep, there’s a blog post on here all about dahlias. Just use the search function (right hand navigation bar) to search for “dahlias” and it will come up.