How To Take Dahlia Cuttings
Vices. Everyone’s got them. I don’t smoke. I rarely have more than one drink at a time. I don’t shop for clothes or shoes unless I really need them. But I do consume more dark chocolate than is probably healthy. And I can’t stop myself from buying over-priced dahlia tubers each winter, even when I already have too many tubers stashed in my basement. I really love getting the new introductions each spring, the varieties no one else has yet. But paying $10-$20 for a tuber is a pricey addiction. Good thing I know how to take dahlia cuttings!
I can justify the expense because I take that one pricey tuber from the supplier and turn it into six or seven plants. The art/science of taking cuttings is a magic trick any good horticulturist has up their sleeve to propagate coveted plant material. How to take dahlia cuttings couldn’t be easier once you know how to do it.
Cuttings are also a great way to increase your stash of a particular favorite variety. This season here at Love ‘n Fresh, we’re culling some of the varieties that aren’t top sellers and beefing up other varieties (like Cornell, Sherwood Peach, and Jason Matthews) that we love and want to have lots of this autumn for the beautiful boatload of weddings we’ve got coming up.
So here’s a handy step-by-step guide for how to take dahlia cuttings to multiple your stock.
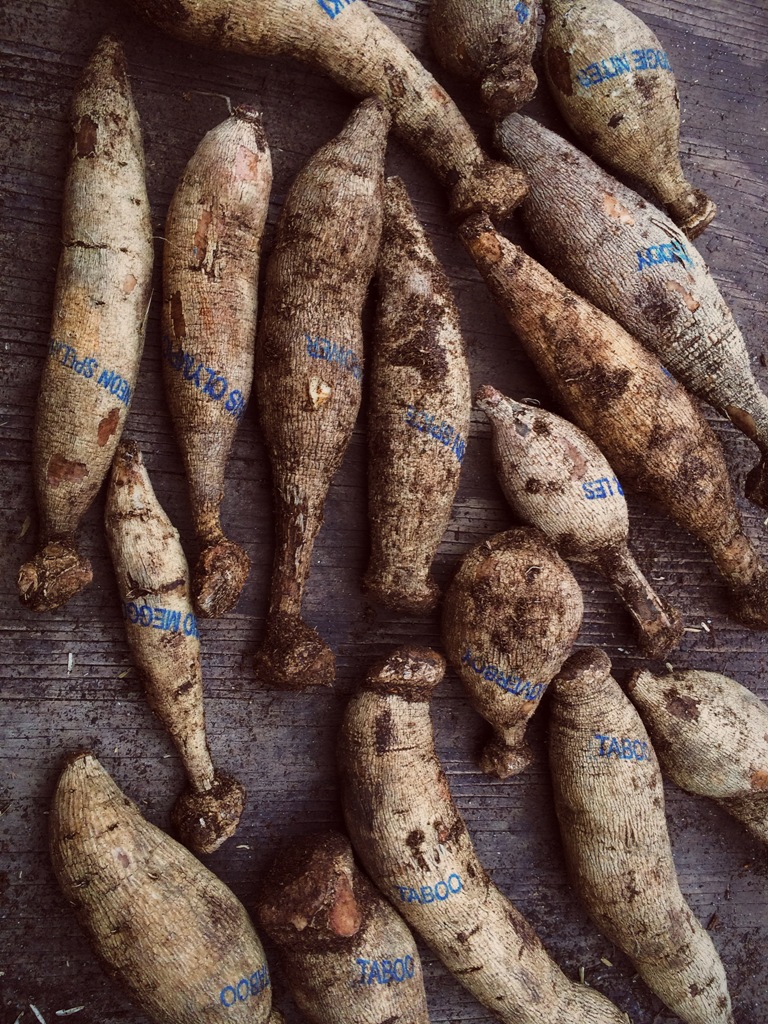
We order our new tubers almost exclusively from Swan Island. We pay a little extra to have them shipped to us in early March so we can get the cuttings going in the greenhouse and nicely rooted for planting come mid-May.
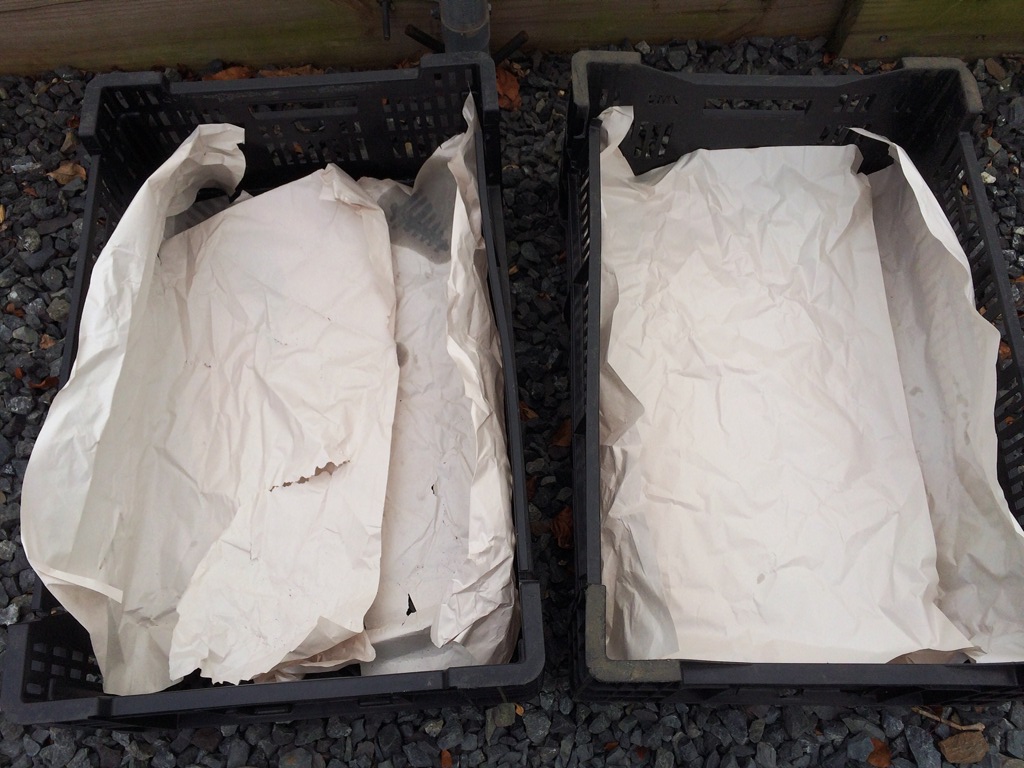
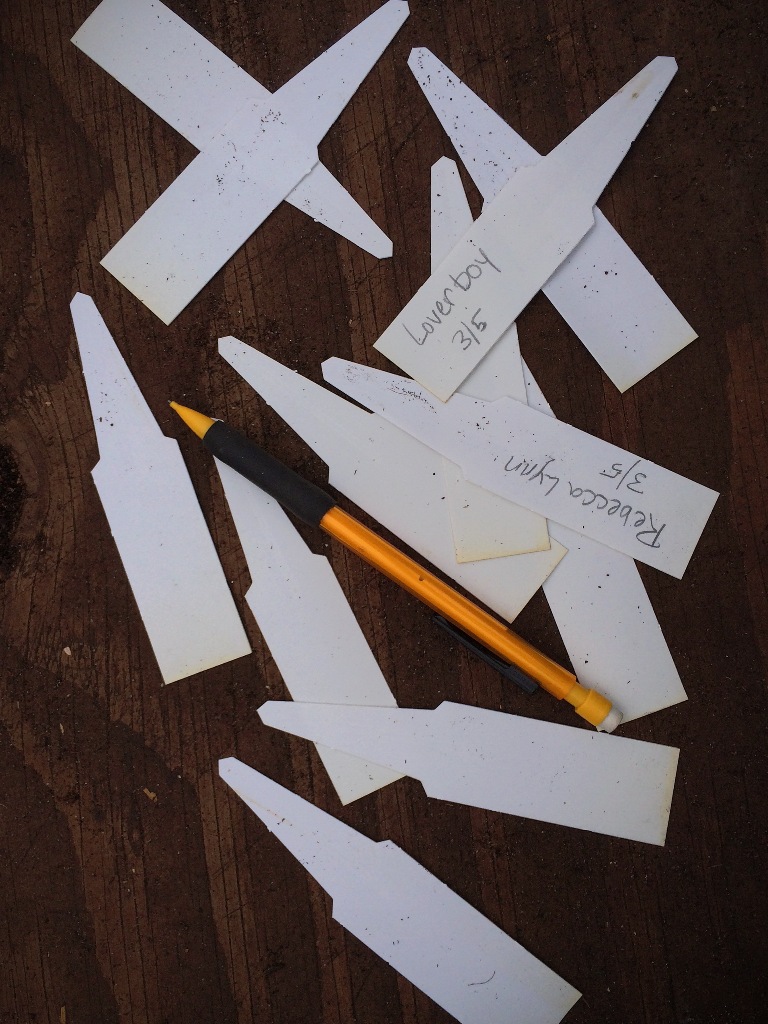
To begin, we line black bulb crates with paper and then fill them with moistened ProMix potting soil. Then we unpack the tubers from their shipping box and lay them out so we can see the names, which are stamped on the tubers. We’re very careful to stay organized by creating tags for each cultivar so we can keep cuttings from each cultivar together as we root them and then plant them together in the field so harvesting single-variety bunches is easy and efficient.
For new growers, here’s a little general tip you might not know. Write your plant tags with pencil. It will last much longer than pen, marker, or anything else. Trust me. It seems illogical, but it’s true.
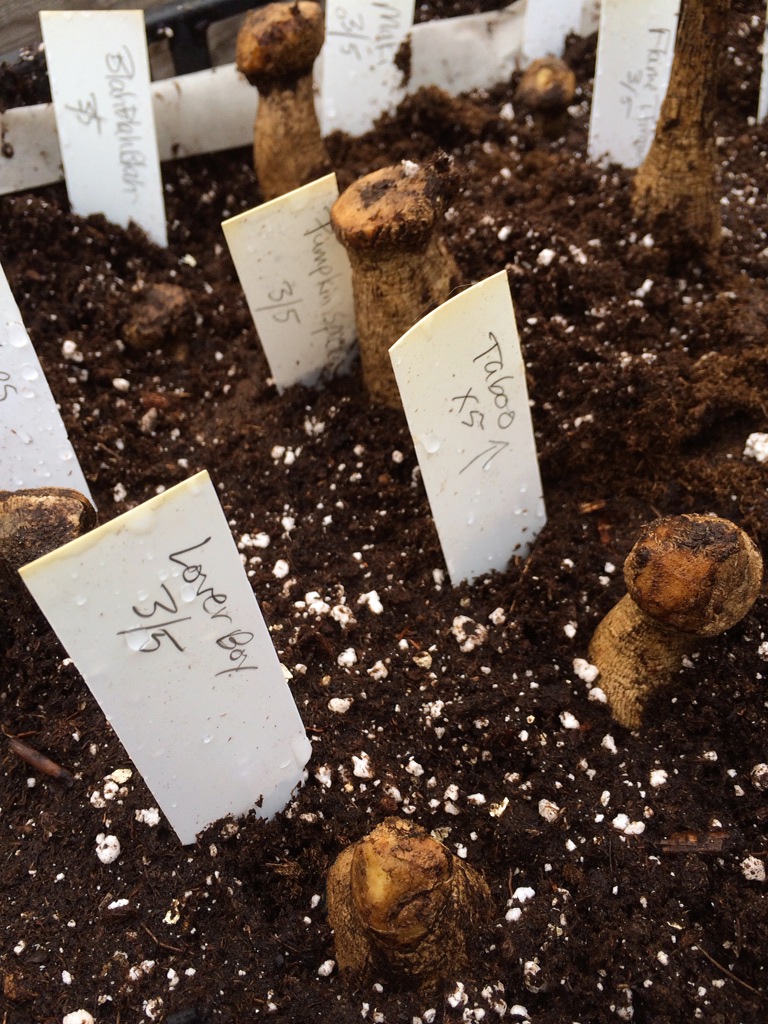
After we’ve got a tag for each tuber/variety written up, we pop the tubers into the potting soil in the crates. Tubers should be placed vertically and the top of their necks should remain out of the soil (you’ll see why a little further down the post). Tubers get packed fairly tight in the crate since they aren’t going to be growing like that long-term. Twenty-five tubers can easily fit into one crate.
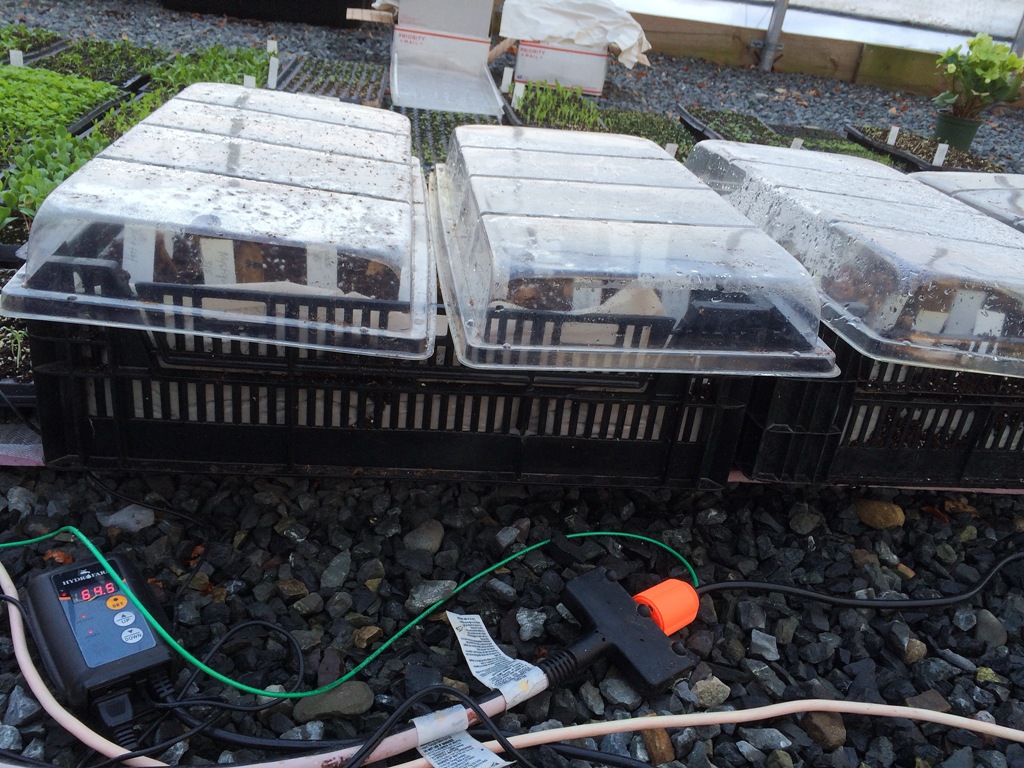
Once a crate is full of tubers (and their associated tags), we gently water the crates to settle the soil around the tubers and then place the crates on heat mats set at 70F. This winter, since it was so very cold, we were keeping the thermostat in the greenhouse pretty low. Dahlia tubers do not like to sprout if they feel a chill in the air so we covered the crates with humidity domes to keep the ambient temperature around the tubers a bit warmer. Worked like a charm.
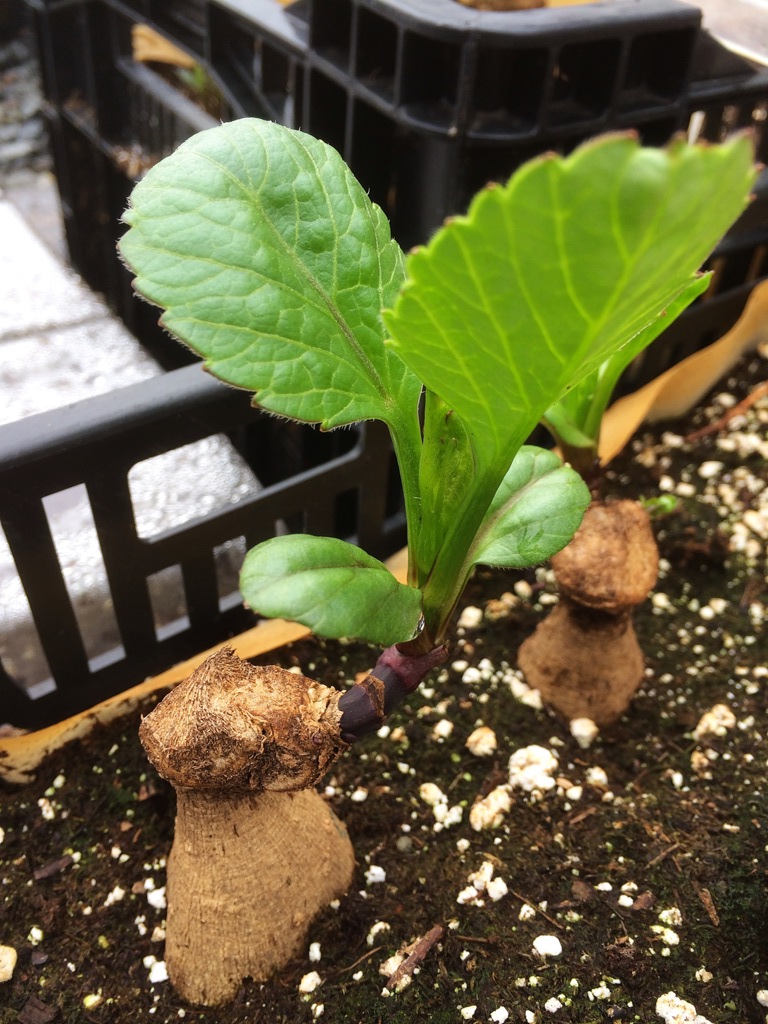
Tubers usually start sprouting about ten days after going on the heat mat. It takes another week or so for the shoots to be large enough to take cuttings. Shoots should have two fully developed leaves and more on the way as well as a stem that’s at least an inch long before taking the cutting.
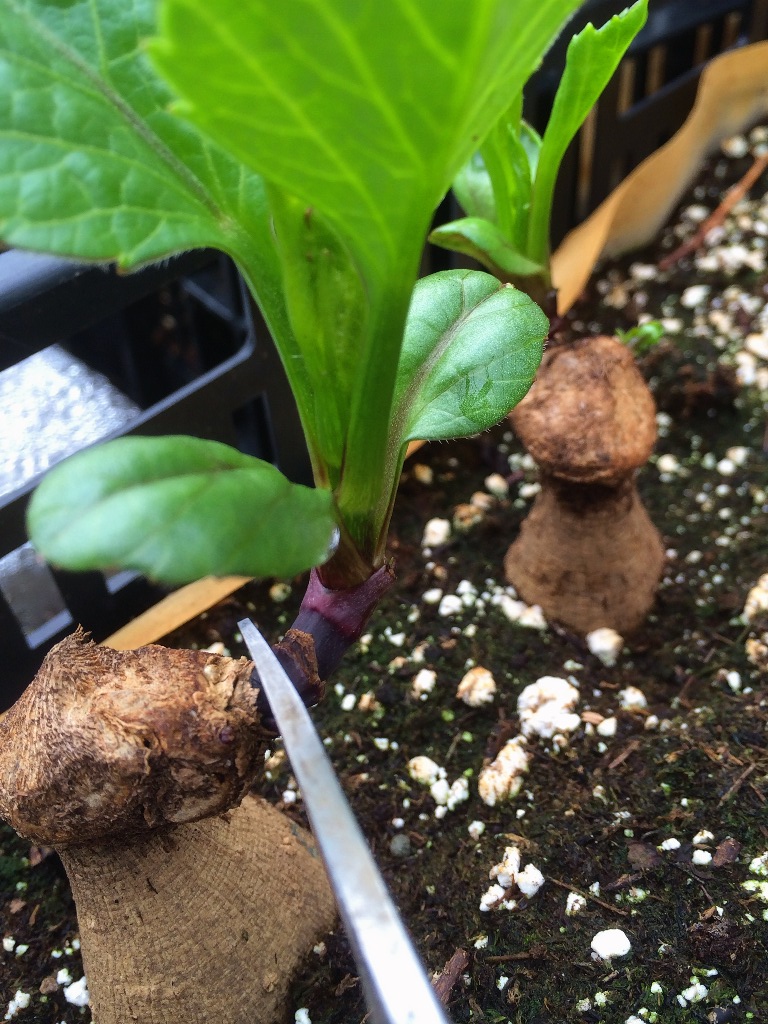
Now you can see why we leave the necks of the tubers sticking out above the soil level. To take cuttings, you need to be able to cut cleanly right at the base of the cutting where the fresh green growth meets the brown neck of the tuber. If the tuber was fully buried, it would be hard to take a clean cut without possibly damaging the delicate growing point that resides just inside the tuber’s neck. Once that growing point is damaged, the tuber will be far less productive so it’s important to be very careful to not cut into it. But you also don’t want to cut so that there’s still a piece of the green shoot left on the tuber. If you do that, you’ll get branching so that two shoots come out from the green stump, but they will be weaker and take longer to be a good cutting size than if you just make a clean cut in the first place so one strong shoot grew back in its place. Capisce?
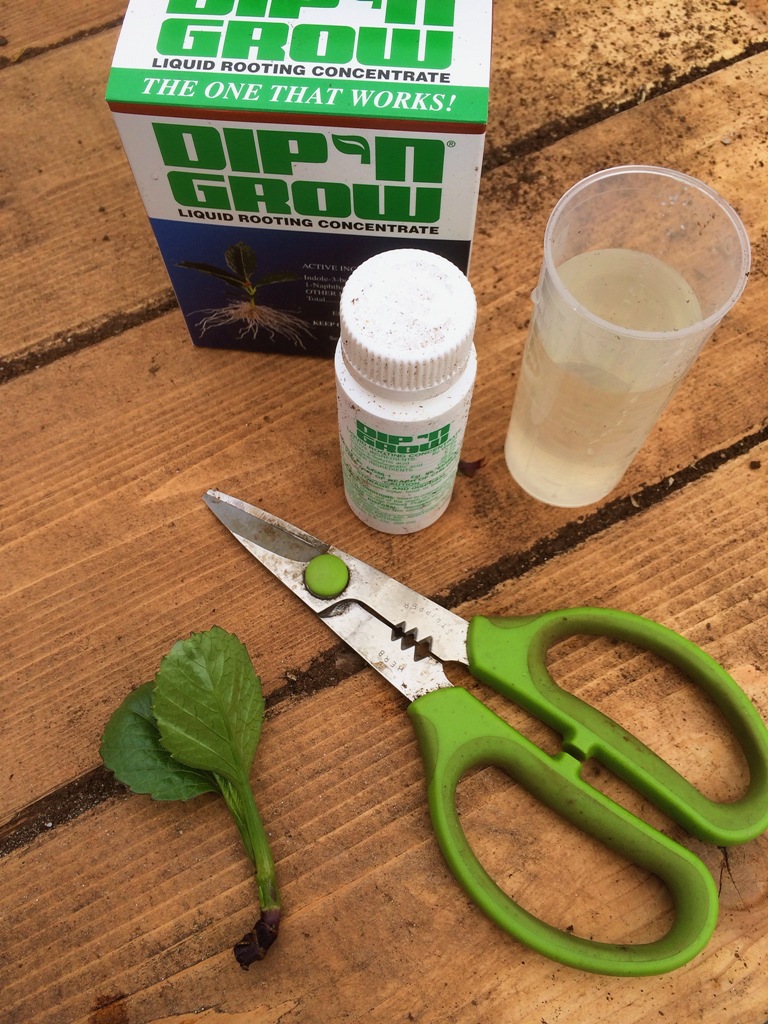
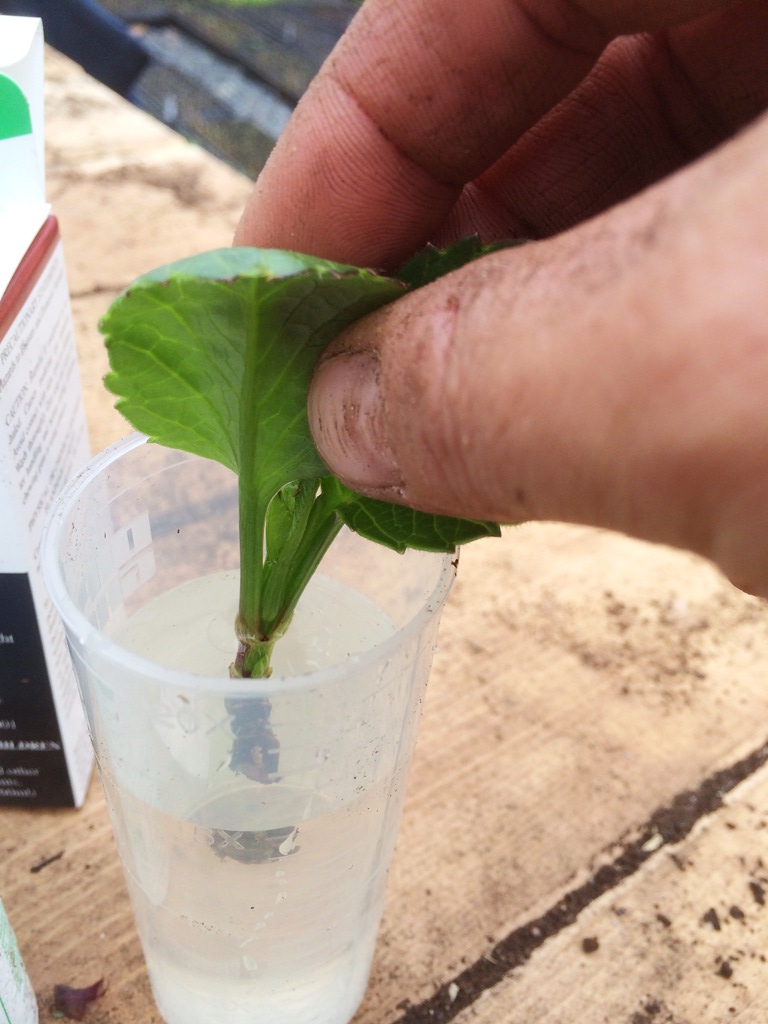
Before taking cuttings, prepare a tray (we use 128s) of moist potting soil and make sure there’s enough room on your heating mat to accommodate that tray. Cuttings really need bottom heat to start rooting quickly or they will just turn into mush. You should also have some form of rooting hormone on hand to encourage rooting. We use Dip ‘n Grow because it’s relatively inexpensive and pretty fool-proof. Just add a bit of the concentrate to the included cup and then fill with water to the desired dilution line. Dahlia cuttings are dipped in a 20x dilution for about an eight second count.
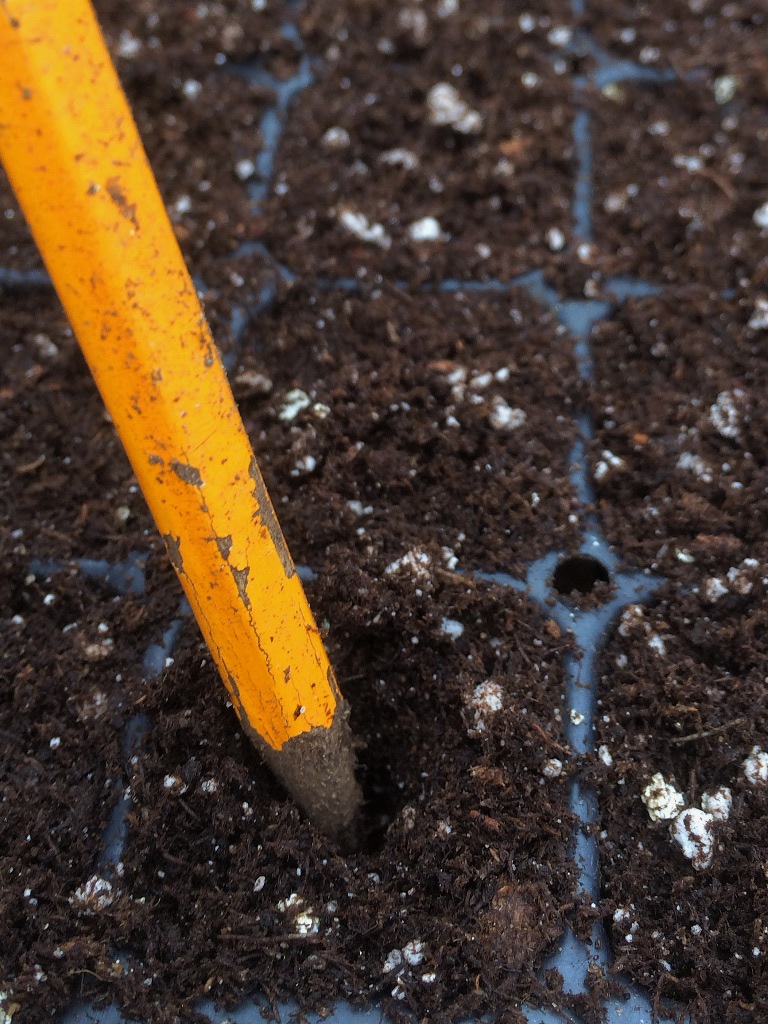
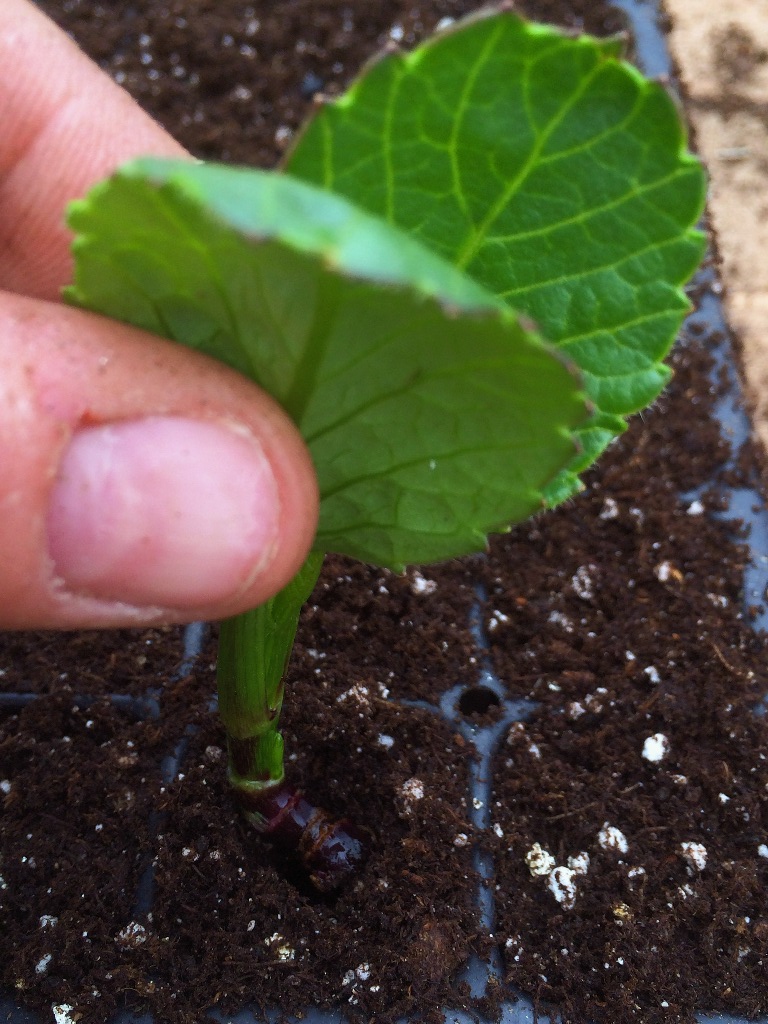
Use a pencil to create little holes in the soil in each cell of the tray and place freshly dipped cuttings into these holes. It’s important to create the holes in the soil with a pencil first so that the rooting hormone on the cutting doesn’t get wiped off as the cutting slides into the soil.
Remember to label each cutting so you continue to keep your varities organized for efficient harvest once they’re set out in the field. It’s good to include the date you took the cutting so you can track how long you’ve been waiting for it to develop roots. Sometimes you have to just chuck a cutting if it’s been inactive for several weeks. But we generally only have a handful of cuttings (out of hundreds) that get tossed each spring.
Keep your cuttings on a heat mat until they’ve developed enough roots that when you gently tug on the leaves there is resistance. At that point, you can chose to either leave them in the same tray or pot them up into a larger container to grow on some more. We usually bump ours up to a 72 tray to grow on a bit before going out into the field.
While the cuttings are getting rooted, make sure to never let the tray dry out completely or else they will wilt so badly they’ll never rebound. You can mist the leaves once a day while the cuttings root to help them maintain moisture. It’s a good idea to keep trays of fresh cuttings in a shady spot so they don’t transpire too much in hot sun and wilt beyond recovery. You can place a humidity dome over them if you want, but sometimes that does more harm than good. Humidity domes create a very hot and humid environment which can lead to rotting in dahlia cuttings unless you are monitoring them very closely. We just make sure to keep trays evenly moist on heat mats and that works really well for us.
Keep taking cuttings from the mother tubers until mid to late April. We usually take five to seven cuttings from each mother tuber. Any more than that and you risk depleting the mother tuber so much that it will not be productive when you plant it out in the field. Depending on conditions, cuttings are usually rooted and actively growing on their own in three weeks. How big you want them to be before planting them out in the field is up to you.
We fertilize both dahlia cuttings and dahlia plants in the field with weekly foliar applications of a mild mixture of various ingredients such as fish emulsion, kelp, bat guano, humates, vinegar eggshell solution (WCA in KNF), raw milk,and compost tea. The exact formula changes during the course of the plants’ life cycle. This application really helps combat disease and encourages the plants to put on healthy growth quickly.
Now that you know how to take dahlia cuttings each spring, you can quickly multiply your stash in no time. Each cutting, if grown properly for a full season in the field, will produce several tubers that can be dug up in the fall. Play your cards right and from one expensive tuber in the spring, you can have 40-60 healthy tubers by the fall. Talk about magic!
To read more flower farming how-to blog posts, click here and here.
Thanks, Jennie, for this valuable information. I took cuttings for the first time last week after consulting several sources. I like your method the best and will be attempting it this week. I’ll let you know how I make out 🙂
Horray! So glad to hear you took cuttings, Lynn!
SO helpful, Jennie! Thank you!
You’re welcome, Sas! 🙂
What a great demo!! Doing cuttings on my own makes me nervous, but you’ve made it look straight forward enough… I might try it out! Thanks!
Do it! It’s really super easy. 🙂
Nicely done with really great photos! It is really hard not wanting every variety that Swan Island Dahlias offers.
Thanks, Denise! We really need to start a dahlia support group. 😉
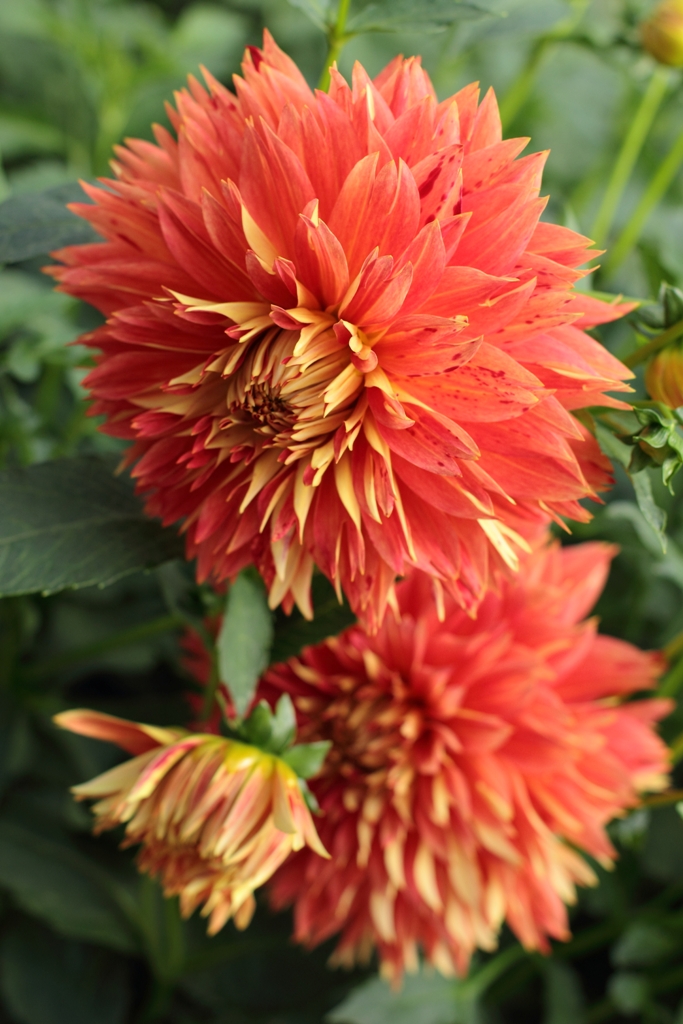
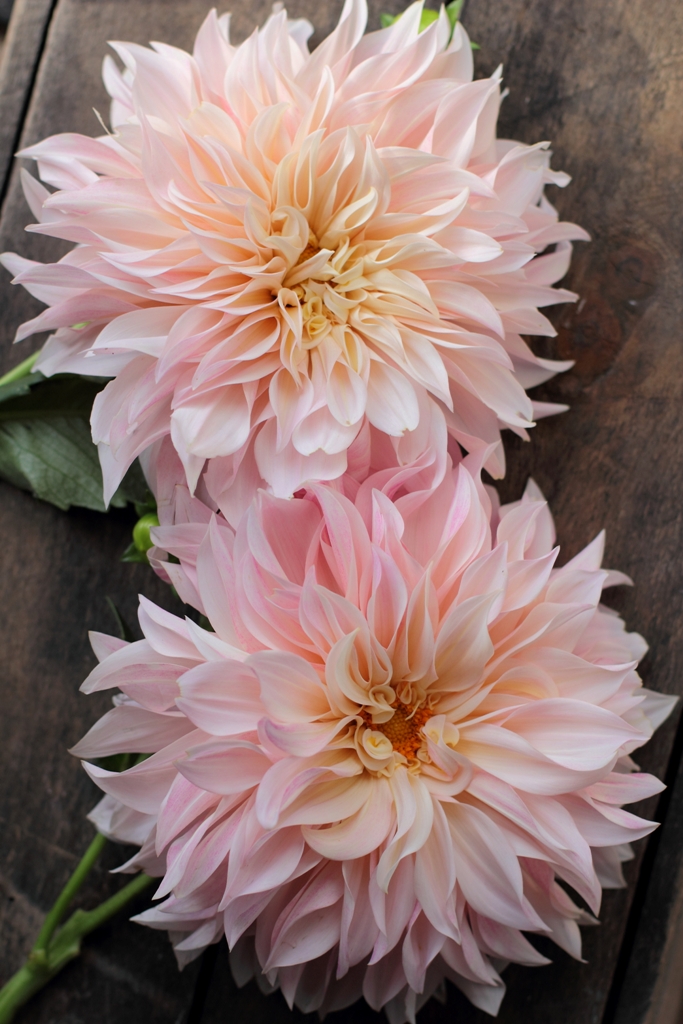
Thank you for your article. I will be giving it a try in spring in Australia. Could you tell me what beautiful variety the 2 flowers are that you have pictured
Sincerely
Melissa
Thank you! thank you! I think I like your way of rooting the cuttings better than any others I’ve seen. I’ll try it on my next batch of tubers arriving next week!
You should absolutely try it, Melissa! Let me know how it goes!
Genius! Thank you for sharing!!!
One can never have enough dahlias, especially for fall weddings, right? 🙂
Badass! Thanks for such a thorough and clear description of the propagation process!
🙂 Thanks, Kim!
Thank you so much for this post. Having just received a box full from Swan Island, I am thrilled to get to try this. Last season I put mine in the ground to early in the wrong conditions and they all died, but one. I was so disappointed. I appreciate your time in writing this post so I can get it right this year 🙂 What a great way to justify a dahlia splurge!
Oh no, Kristy! I hope this helps you make the most of your new collection! I always tell people to plant their dahlias when they plant their tomatoes. Good luck this season!!
Jennie have you ever found the need to snip the leaves of the cuttings in half to reduce transpiration? Totally loving this how-to blogpost! 🙂 Thank you!
Good question, Katie! I do not bother with snipping leaves on dahlia cuttings. They root very quickly so I don’t find they need it. I do snip the leaves of some other cuttings we take, like begonias and woodies that take longer.
Beautifully done. I wish that I had read this post before I ordered 400 or so of the expensive tubers! This is my first year as a cut flower grower and I have a lot to learn. Thanks for teaching!
Now I won’t feel so bad buying a tuber for $8!! Would you happen to know a rooting medium that is certified organic? Thanks again, your work is great!
Thank you so much Jennie! This is such a useful post! I appreciate all your hard work and love your style, happy spring!
Hi Jennie! Thanks so much for this post – so helpful for those of us who are nervous about this kind of thing, and helpful for me in particular in trying to bet up the dahlia stock at our little non-profit.
I do have a question – and it may be a silly one. I followed your method and about half of the tubers have produced good-sized growth, I’ve taken those cuttings and they are (hopefully) rooting in their new trays as we speak! For the tubers that have already sent out 4 or 5 shoots, what’s the best thing to do with them if I can’t get them in the ground for another few weeks? I don’t want them to keep sprouting new growth, I imagine, but don’t want to cut it off either. I’m worried about the tubers exhausting themselves 🙂 Any advice? Thanks so much!!
Good question, Lennie. This is an unusual year where the weather just won’t warm up. The same thing is happening to my tubers. I am just holding them in the crates, letting the growth continue to grow on the tubers. As soon as the weather warms, I’ll put them out in the ground. Usually we can plant out the mother tubers under a low tunnel in late April but this year I’m not willing to risk it with the nights in the 30s still here. Good luck!! 🙂
Just found out I’m inheriting a bunch of tubers free from a friend. I’m guessing it’s too late to do cuttings and I should just get them in the ground. Do you get flowers from your cuttings in the first season or just tubers for use the following year? Just curious, definitely want to try this out at some point! Maya
Thanks so much for this post Jennie! I’ve referred to it a few times. Just got my hefty box of tubers from Swan Island yesterday and am going to try this for the first time. Seems like a no brainer! If you ever form a dahlia support group…I’m in.
I’ve done plenty of cuttings when working in the greenhouse industry. What do you do about Royalties? Are you taking cuttings from royalty free plants? Just curious who you’d have to pay the fees to? thx!
I asked Swan Island Dahlias if any of the dahlias I was buying from them were patent protected. The woman on the phone was confused by my question. Many of the dahlias sold by Swan Island were hybridized by them, and it seems that they don’t patent them since she was unfamiliar with the concept. I do know that the Karma dahlias WERE patented. I believe plant patents are good for 20 years (not swearing I’m correct on that) so at some point it will be okay to propagate them as well.
Plant patents only need to be considered if you are SELLING the plants you propogate. If you are just using the plants for your own production/operation, you do not need to worry about patents. Flowers cut from a patented plant are able to be sold, just not the root stock. Hope that helps clear things up a bit.
Wonderful.
Thanks Jennie for this very clear explanation. I am wondering if you know somewhere I can find out the approximate number of days it takes for a dahlia to bloom once you up pot the cuttings? Are there different lengths of time for the different sizes AA, A, B, BB etc. ?
Marcia
I’m sorry, Marcia, but I don’t know that info. Cuttings generally are later to bloom than our tubers, if that’s helpful to know.
Thanks Jennie for this information and I’ve got two questions hopefully you can help me with that :
1) Dahlias grown from cuttings will they produce one or more healthy tubers.
2) and if they produce tubers can they be divided to grow more Dahlias…
yes,they will produce more tubers and can be divided into new one’s
I was wondering if Dahlias can be planted solely indoors in a pot. If I start now will they grow in time for my wedding early May?
Hi Jennie!
I have a question for you. A lot of my cuttings seem to be wilting right off the bat. I had taken a few that were a little bit bigger, maybe three sets of leaves fully developed. Could this be the issue – that I am taking the when they’re too large? I’ve been putting them in deeper pots to avoid bumping them up later…. perhaps the bigger pots aren’t allowing the heat mat to effectively do it’s job?? Any thoughts??
Thanks so much!
Thanks for wonderful information. I’m having fun cloning dahlias with cuttings and passing out plants to friends and family. It is my first year and most all are rooting.
So my question is about planting out the mothers. Should I bury the growth that is coming on them in May 15 when we plant out around here? And should they be planted at the same depth as other tubers?
It is an awesome experience!
Hi Len –
Yes, you can plant out the mother tubers at the same time as the other tubers in mid-May. Just plant them at the same depth and any growth that gets buried will just grow up out of the ground. I’m glad you’re having so much fun with dahlias!! They are very addictive! 🙂
Hi Jennie
Please can you tell me what the name of the two multi petal pink Dahlia’s are called ? they are stunning! and if they are available in the UK?
Hi Jennie! Thank you for this! Do the cuts need light if I am doing it in my garage? I don’t have a green house and it’s just for my small garden. If so, how many hours off/on?
Wonderful post. So helpful! Thank you!
Thank you for this! If I do not have a greenhouse, will putting them under lights work?
Hi Jennie! I just started your method. I do not have a greenhouse but I do have shop lights and a heated mat. Will the tuber still send shoots with the lights on or is that too much light and I will rot my tubers? Any advice for indoor growing would help a lot. Thank you!
My question follows up right with Mariam!
I don’t have a greenhouse… and I took cuttings following your method— (except I used a powder rooting hormone instead of liquid). Well, the same day that I put these cuttings on a heat mat, under the shop lights they start to wilt SO BAD— I know they won’t rebound… So when I took more I made sure to water them good & keep them watered— but they don’t seem to be rooting. Every single one seems to subcumb to rot/damping off in the end & some wilt even with all the water in the process.
I even moved the shop lights up so they were a good 6-8 inches away.
My only other option is in our Sunroom. It gets a decent amount of light but has no insulation so is very hot or cold depending on the weather. I’m feeling pretty discouraged.
Great post! Looking to improve our yield this year, and this will greatly help.
Hi,
Can I root Dahlia cuttings in water, or should I plant them straight into the soil? I have a huge cutting which I’ve trimmed the bottom off, and cut at an angle. I’m trying to root them in water like I’ve done with my Rose plants, but I don’t know if this is the correct way to do it!
Your help would be much appreciated!
Lots of good info and questions!!
May I suggest the following resource to further educate any interested:
The American Dahlia Society -website at Americandahliasociety.com has tons of info in regards to other growers, pictures of flowers and regional resources for sales, and even shows around the country where more dahlia crazy folks share info. It might be a society, but the only gloves allowed are ones that are good for manure, worms, and beautiful soil.
Love this! Thanks for sharing!
Thank you for this lovely post! So helpful….I need the pictures. I’m sure it took a lot of time to put together. I want you to know it’s appreciated. 🙂
Do dahlia cuttings bloom the first season?
They sure do!
This was my first year growing dahlias and I have loved them. I did 8 varieties this year and defiantly want to add more next year, this was a really informative and valuable! I’ll try to propagate all the ones from this year, and any new ones I get so I’ll have lots more flowers next year! Thanks for the great article!
Thank you so much for this post! I’m growing dahlias for the first time this year and am excited to try to get more plants out of my bulbs. What temperature do you set the heat mat to for the bulbs and for the subsequent cuttings? I’m using my spare bedroom for my grow room and keeping it at a consistent 70+ degrees, would that be warm enough to go without a heat mat? Thanks in advance!
The heat mats are set at 75F while the tubers are sprouting and then at 70 for rooting the cuttings. Bottom heat from a heat mat really helps the cuttings root. So you can try it without the heat mat but you may want to invest in at least a small little mat for your tray of cuttings. Heat mats are really affordable! Good luck!! I hope you have many dahlias in your future!
Hi there! Thank you for this wonderful post. I would love to see another full post on your foliar sprays!! The technique you mentioned for bioavailable calcium is genius, and I’d love to hear more about your ratios and how you mix your sprays if that’s not something you hold close to the vest.
Jennie,
Thanks for this post, it is very informative. What are your thoughts doing the cutting process, but starting later? I don’t have my tubers, yet, (mid April) and would love to increase my stock, but wonder if this is going to be too late in the season (zone 6a/6b). Thank you!
Thanks Jennie for a great how-to! Do you plant the rooted dahlias at the same spacing as the tubers? Wondering if they could be a little tighter the first year.
Where can you get the humidity domes for crates please and thanks!
There are not domes specific to crates. The ones I use are meant from seed trays. I purchase them from Nolt’s Greenhous Supplies.
Jennie
I have grown Dahlias for years with great success.
However this year has been a disaster
Some greenery but the flowers are few and far between.
Every year I lift my small collection of favourites and plant them out in fresh compost in the spring. In the south west our climate is good. However this year has seen exceptionally high temps. No matter how much water and love given the results are poor. So is it time I ditched the lot and started again?.
Incidentally I am an Author and have 2 books of a trilogy published.
I don’t know if you have written a book but if not you should.
Your knowledge reflected in your emails are exemplary, a star amongst the Dahlia loving community.
Many thanks
Brian G bri
I’m going to give this a try for the first time this year. I’ve caught the dahlia bug and need to multiply the tubers I spent a fortune on! lol Thanks for sharing your knowledge, Jennie.